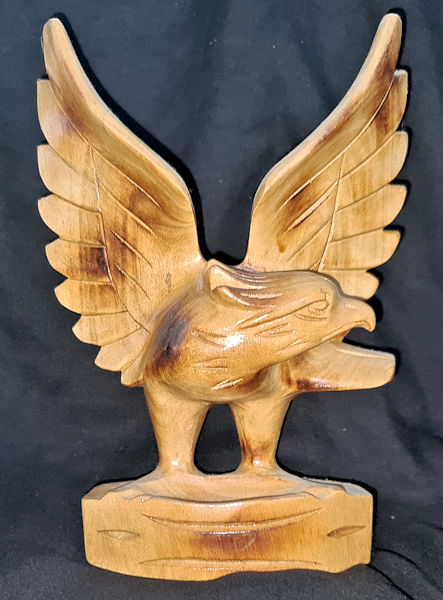
Making wood carvings is a widespread industry in the Phillipines, often a cottage industry involving local crafts-people making them for the tourist market. In fact, according to Rosanna Rogacion on her blog, that craft is over 2000 years old. So, while visiting the Phillippines around the late 1990s, I was pleased to buy this eagle carving at a woodcarvers village tourist attraction near Manila: I believe it was Asin Road Woodcarver’s Village, although I can’t say for certain. It was hand carved and so quite individual rather than being a mass produced design. It was also very cheap, I think around ten UK pounds equivalent, so quite a bargain in my opinion. Also, the quality of the carving, and the smoothness of the finish, are a testament to the Filipino crafts-person who spent hours making it. So, obviously I was inspired to 3D scan it so I could make a 3D printed mini-model.
Quick summary of this 3D creation
Overview: A 3D scan of a carved wood eagle made by a traditional Filipino crafts-person in the Phillippines.
Location: Manila, Phillipines [map].
Date/era: Modern, late 20th Century.
Software used: XYZScan Handy, Meshmixer.
Intended use: 3D printing, either in resin or fused filament.
It was scanned using an XYZPrinting hand scanner v1.0A and the results were very pleasing, especially as it has a range less that half a metre to the target and a spatial resolution of 1mm at best (and likely up to 2.5mm in reality). That XYZ 3D scanner is a relatively cheap one, based on a Realsense depth sensor, so I wasn’t expecting a brilliant scan. In fact, from experience I’d found that it can be very temperamental, often complaining the scanner is too close or too far away. However, apart from that, the XYZScan Handy software is quite good and I was happy to find that the scanning went well without any major mishaps. Also, I was very happy that it produced a good representation of the original eagle carving, including the shape of the feathers along the edges of the wings.
The 3D scan was then post-processed using Meshmixer to remove extraneous areas and to remesh to a sensible file size. The solidify tool was used for that, with the sharp edge preserving setting allowing a sensible file size with minimal loss of the limited detail contained in the original scan. Meshmixer has a wide range of available tools that are very useful for processing 3D scans, including 3D sculpting brushes that are as good as those in many commercial sculpting packages. It also has good features for closing cracks, as well as translation, rotation and scaling. But I think probably the most useful is the tool for making a new solid, through re-meshing. You can see the finished model on Sketchfab below (click the play button to load the model and view it in 3D).
The finished model in the photo below was printed in wood-infused PLA using a Monoprice Mini 3D printer. It did a good job of making a 3D print for me to display on a shelf at a small size, and it handled the wood-infused filament very well too. I was impressed to find that he wood-infused filament gave a very nice look and feel, to the touch much like holding real wood, although it was a little brittle in narrow areas: it had to be glued back together after accidentally breaking across the legs while I was filing and sanding the surface. However, removing support and cleaning was very easy with wood-infused PLA, compared to normal filament, which made life much easier than for ‘normal’ fused-filament 3D print post-processing. Of course, if you don’t want the wood effect then obviously you should get good results with your favourite filament as well. However, I found this project an opportunity to try out a new filament type, and I was very impressed by the wood-like quality the print achieved.
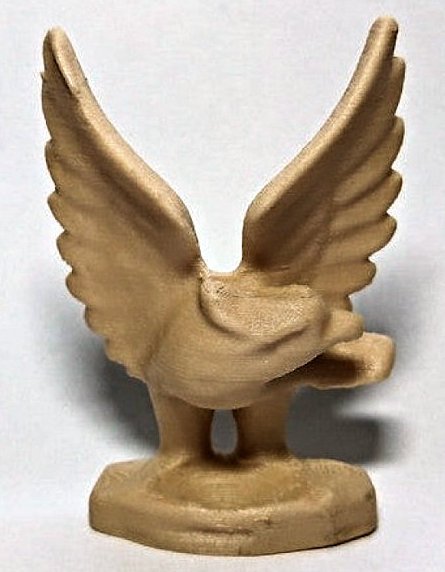
After coming out of the printer, and filing support material remnants away, the print was rubbed down with increasingly fine sandpaper. There were two reasons for that, the first obviously being additional support material remnant removal. The second, however, was specific to using wood-infused PLA filament: basically it helps expose the wood particles, which helps give you a good finish using wood dyes (obviously this isn’t important for other filament types). After that it was finished with a couple of coats of water-based wood dye, followed by a couple of coats of matt varnish to smooth out the roughened surface and provide a little glossiness. And if you want to be a bit more traditional, I found that commonly available pine-effect Danish Oil works just as well (unsurprisingly as it’s mostly a mix of wood dye and varnish) with very little effort. If you want to try 3D printing it yourself, click here to go to the MyMiniFactory page, or here for the Thingiverse page, to download it.
So finally, in case you’d like to use the methods in this project for your own work, let’s recap on what was involved:
- An XYZPrinting hand scanner, together with their XYZScan Handy software, was used to create a 3D scan, which provided a good representation.
- On a PC Meshmixer was used to tidy the 3D scan, including cutting away unwanted material, smoothing poorly scanned areas, and sharpening some edges.
- Meshmixer was also used to solidify/remesh the model, to achieve a much smaller file size, using the sharp edge preserving setting so as not to lose what fine detail was available in the original scan.
- The finished 3D model was then test printed in wood-infused PLA and found to print to an acceptable quality.
- Due to the limited amount of detail in the final model, resin printing isn’t really necessary, although it should work well, especially for smaller prints.
Please note that this scan is provided without any license for commercial use. It is intended simply as a model you can have the fun of printing yourself. And obviously it’s intended as motivation for you to visit the beautiful islands of the Phillippines and, if you’re lucky to find a traditional crafts-person, maybe even buy your own Filipino wood carving.


