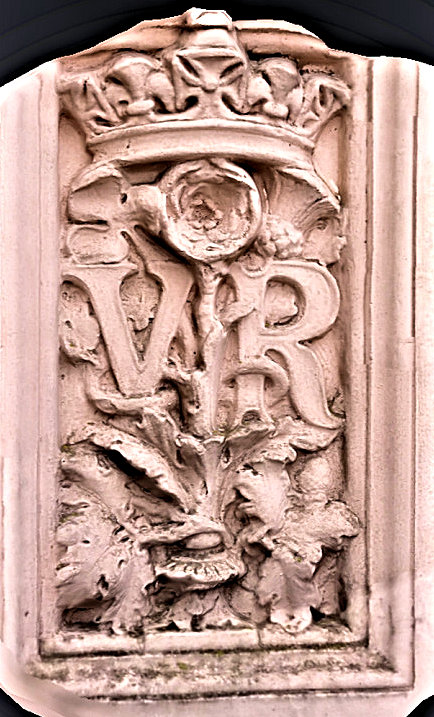
Sheffield is a treasure trove of interesting architectural features and public art. However, sometimes it’s easy to miss the wonderful little details in day-to-day features like, for example, gate posts. So while visiting this beautiful city I was taken by surprise at the elegance of one of the terracotta insets on a gate pillar at Weston Park, which is one of the great green open spaces this city offers to residents and visitors. It can be found at the southeastern entrance to the park, just a short walk from Sheffield City Centre in the UK. Walking north in to the park you can find it on the left-hand post. It’s a very nice feature obviously from the Victorian era, as indicated by the ‘VR’ included beneath the crown and rose: i.e. Victoria Regina meaning Queen Victoria.
Quick summary of this 3D creation
Overview: A basic scan of the terracotta inset in a gate pillar at Weston Park in Sheffield, incorporating the text ‘VR’ representing ‘Victoria Regina’ for Queen Victoria.
Location: Weston Park, Sheffield, England, United Kingdom [map].
Date/era: Victorian, possibly circa 1873.
Software used: Sony 3DCreator Android app, Meshmixer.
Intended use: 3D printing, either in resin or fused filament, the latter not requiring support material if oriented flat on the build plate.
The presence of VR on this object obviously indicates it is from the Victorian period and that’s backed up by the Wikipedia page for Weston Park which states ‘Robert Marnock was commissioned to design the park in 1873. New terra cotta pillared entrances were established at Winter Street and Western Bank using designs by Godfrey Sykes‘. However, being situated on the southern side of the park, based on the Wikipedia text it’s not guaranteed that this pillar inset was installed at that date, although it does fit with the description of a terracotta pillared entrance feature. But, based on the facts at hand, I think it seems likely that it was installed in 1873, or soon after, and almost definitely while Queen Victoria was on the British Throne.
The scan was done with the Sony 3D Creator app on an Xperia XZ1 Compact smartphone. It did a very good job getting a representative shape, although it obviously isn’t quite as detailed as the original. That’s especially true of the sharp edges that still survive on the original, which tend to become rather softened when scanning with 3DCreator. Also, it didn’t manage to include the upper corners, although they’re very simple and easy to edit in if you want your own 3D print and consider it important. The scanned 3D model was then post-processed using Meshmixer to remove extraneous areas and to remesh to a sensible file size.
As the model was intended for 3D printing, the file size may not seem very important, which is mostly true. However, Meshmixer does a good job of significantly reducing file size, and hence the vertex and face counts, without worrying loss of detail, often to a quarter of the original size. I achieve that by using the sharp edge preserving setting when remeshing, which helps ensure details remain even though the rest of the mesh is greatly decimated. And the smaller file size helps with ensuring fast loading in the Sketchfab viewer, as well as meaning you can download it quickly. You can see the finished model on Sketchfab below (click the play button to load the model and view it in 3D).
The 3D printed version in the photo below was made using PLA filament, on an XYZPrinting DaVinci Jr printer. I printed it at an angle to help bring out the detail while still minimising use of support material. I could have printed it flat on the print bed, and so not have needed any support material. But I find that doing it that way makes layer lines more visible, and harder to hide during painting, so I find the angle method can help improve quality somewhat. The fused-filament printer did a good job of creating a usable print, although given the detail in the model a better print could easily be made with a resin printer if you want a better representation of the 3D model. If you want to try 3D printing it yourself, click here to go to the MyMiniFactory page to download it.
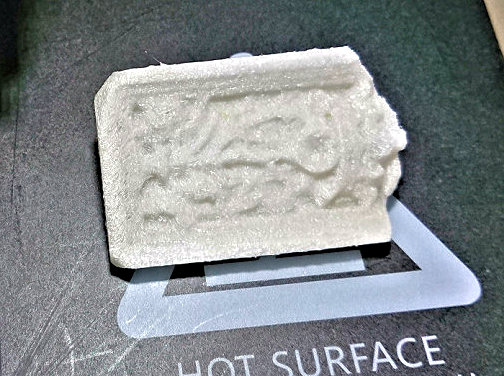
The 3D print was later painted with Pebeo craft acrylics to give a clay effect, which turned out quite well. Then a coat of matt varnish was added to help control the shininess of the surface, to replicate the limited glossiness of weathered terracotta. Use of craft acrylics, which are quite thick, also reduced the detail visible in the photo. So thinner paints (such as from The Army Painter or Citadel) could have been a better option. However, as a model for sitting on a shelf as a souvenir of Sheffield, I wasn’t overly concerned by the small loss of detail craft acrylics caused.
So finally, in case you’d like to use the methods in this project for your own work, let’s recap on what was involved:
- The Sony 3DCreator Android app was used to create a basic 3D scan on a smartphone, which provided a good representation albeit with loss of sharp edge details.
- On a PC Meshmixer was used to cut away unwanted material and solidify/remesh the model to achieve a much smaller file size.
- The finished 3D model was then test printed in PLA, and found to print to an acceptable quality.
- Due to the amount of detail in the final model, resin printing could be a better method of 3D printing it, although not to the extent that fused-filament printing should not be considered a worthwhile option.
Please note that this scan is provided without any license for commercial use. It is intended simply as a model you can have the fun of printing yourself. And of course it is intended to be a motivation for you to visit Sheffield yourself and maybe even have a stroll around Weston Park when viewing this wonderful Victorian carving: click here to see the location in Google Maps.


