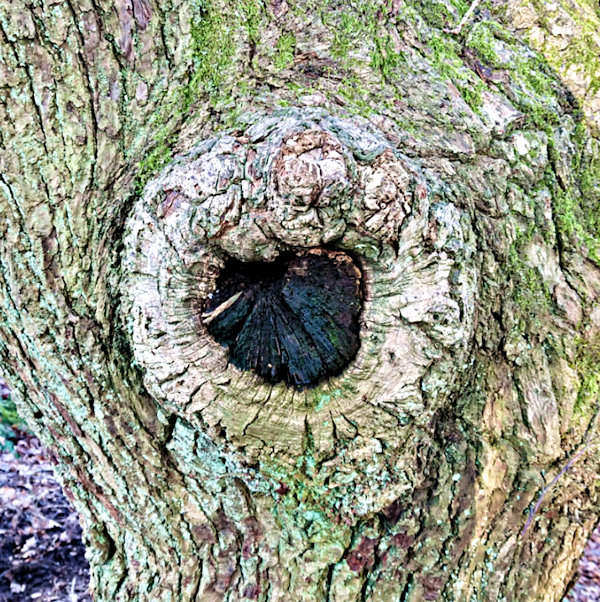
If you’ve seen some of my other scans from the area, you’ll already know that Lickey Hills (south of Birmingham in England) is a wonderful area for recreation, including walks through some wonderful woodland. So, while walking through the beautiful Lickey Hills Country Park I came across a lovely old tree with a fascinating gnarled knot on the side of its trunk. It was only a few feet above ground, so I decided it would be a great addition to my collection of nature 3D prints. Therefore I decided to have a go at 3D scanning it and hopefully you’ll agree it’s another good example of how nature can provide exciting inspiration for unusual 3D scanning and model-making subjects.
Quick summary of this 3D creation
Overview: A scan of a knot in the trunk of a windswept old tree at Lickey Hills Country Park.
Location: Lickey Hills Country Park, central England, United Kingdom [map].
Date/era: Modern, 21st Century.
Software used: Sony 3DCreator Android app, Meshmixer.
Intended use: 3D printing, either in resin or fused filament, the latter being possible without any support material.
The scan was done using the Sony 3D Creator app on an Xperia XZ1 Compact smartphone. It didn’t pick up all of the fine details but it did a good job of creating a usable 3D representation. Given that 3DCreator is a free Android app, I obviously don’t expect amazingly detailed 3D scans from it, but it often pleasantly surprises me with just how good its scans can be. And for quick and spontaneous 3D scanning it’s hard to beat as you don’t have to upload images to a photogrammetry server and wait to see what emerges. If you don’t get a good scan you can see that straight away and try again. And for subjects in nature, like this tree knot, I think it does a very good job, so for adding quick and easy 3D scanning to days out I think it’s an excellent option.
The scan was then post-processed using Meshmixer to remove extraneous areas and to remesh to a sensible file size, for speed of use in the Sketchfab viewer, as well as to allow speedier downloads. The solidify tool was used for that, with the sharp edge preserving setting allowing a sensible file size with minimal loss of the limited detail contained in the original scan. Meshmixer has a wide range of available tools that are very useful for processing 3D scans, including 3D sculpting brushes that are as good as those in many commercial sculpting packages. And, while being provided by AutoDesk, the makers of widely used professional software such as AutoCAD, it’s also free to download and use. You can see the finished model on Sketchfab below (click the play button to load the model and view it in 3D).
The example 3D print in the photo below was made using a Monoprice Mini SLA resin printer, using standard UV-curing resin. However, there are no complicated voids or sharp overhangs that would cause the need for annoying support material you would need to cut away and file down. So, it should also print well in fused filament printing with little, if any, support material if you print it with the base flat onto the printer bed. Of course, that would make layer lines quite visible, so using fine settings in your slicer would help, as possibly would be use of a little high-build primer. If you want to try 3D printing it yourself, click here to go to the MyMiniFactory page to download it.
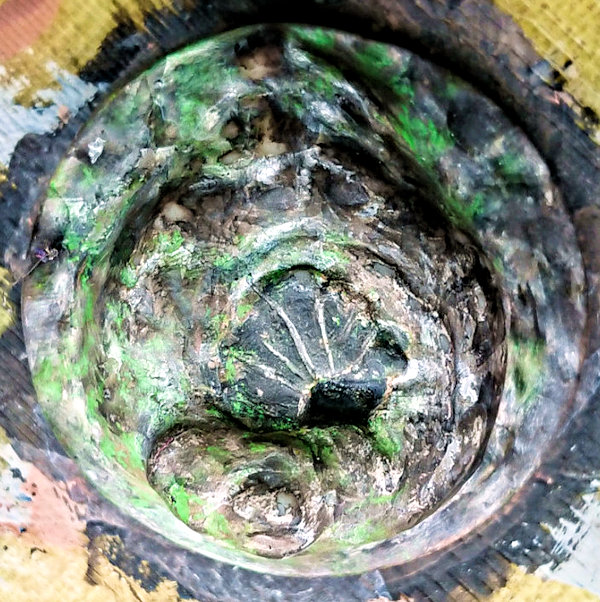
The print was then painted using Pebeo craft acrylics and a coat of anti-shine varnish. Given the uniformity of the printed resin surface, other paints (such as The Army Painter or Citadel ones) would have worked just as well too. Of course, for fused-filament printing craft acrylics have the advantage of being thicker, so are much better at hiding layer lines, so would be useful as an alternative to using high-build primer. Obviously there are no hard and fast rules on how you should paint your 3D prints, but it is useful to consider how different methods relate to the method of 3D printing used. Once painted, I also used a sharp metal point to scratch some extra features into the top: it was easier and more convincing than trying to paint them, and I’m quite pleased with the way it added texture as well as colour.
So finally, in case you’d like to use the methods in this project for your own work, let’s recap on what was involved:
- The Sony 3DCreator Android app was used to create a basic 3D scan on a smartphone, which did a good job reproducing the complex shapes, although fine detail such as bark were obviously not significant features of the scan.
- On a PC Meshmixer was used to tidy the 3D scan, including cutting away unwanted material, smoothing poorly scanned areas, and sharpening edges.
- Meshmixer was also used to solidify/remesh the model, to achieve a much smaller file size, using the sharp edge preserving setting so as not to lose what fine detail was available in the original scan.
- The finished 3D model was then test printed in resin and found to print to an acceptable quality.
- Due to the limited amount of detail in the final model, resin printing wasn’t strictly necessary, so it should work well with fused-filament printing too.
Please note that this model is provided without any license for commercial use. It is intended simply as a model you can have the fun of printing yourself. And of course it is intended to be a motivation for you to visit Lickey Hills yourself for a wonderful amble through the countryside: click here to see the location in Google Maps.


