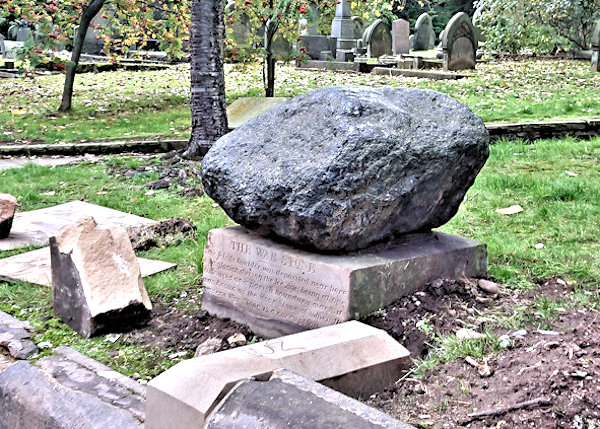
Rocks and stones don’t sound like the most wonderful projects to 3D scan, 3D print and paint. But, when they represent some interesting history, the idea becomes more appealing. And, if you look closely at even the most mundane of stones, you can see that they have a lot of colour and texture that make an interesting challenge for model makers. That’s the case for the War Stone, which sits on the edge of War Stone Lane in Birmingham’s Jewellery Quarter, in the English Midlands. It probably sat in the area for thousands of years, at least since the last ice age, until the surrounding city enveloped it. It then fell into use as a boundary marker at the junction of the parishes of Aston, Birmingham and Handsworth. I’ve seen it many times in the past, while passing through the area, so I decided it would make a nice addition to my 3D prints collection.
Quick summary of this 3D creation
Overview: A basic scan of the Warstone in Birmingham’s Jewellery Quarter, a felsite boulder from the last Ice Age, later used as a parish boundary marker.
Location: Jewellery Quarter, Birmingham, central England, United Kingdom [map].
Date/era: Ancient, Ice Age.
Software used: Sony 3DCreator Android app, Meshmixer.
Intended use: 3D printing, either in resin or fused filament, the latter being possible with minimal support material.
Despite the name, the stone has nothing to do with war, as the inscription below it helpfully explains: “This felsite boulder was deposited near here by a glacier during the Ice Age, being at one time used as a parish boundary mark. It was known as the Hoar Stone of which the modern War Stone is a corruption.” Felsite is a rock type of volcanic origin, being defined at the Free Dictionary as ‘any fine-grained igneous rock consisting essentially of quartz and feldspar’. For that reason, it is also a hard-wearing rock which helps explain how it has survived in Birmingham for so long without too much erosion.
The scan was made with the excellent Sony 3D Creator app on an Xperia XZ1 Compact smartphone, which did a very good job of representing the shape. It even managed to pick up some of the smaller scuffs and scratches that presumably came about when it was rolling along under a sheet of ice. That was helped somewhat by the lack of sharp edges in the Warstone, which are the main thing that 3DCreator has difficulty reproducing. It was then post-processed using Meshmixer to remove extraneous areas and to remesh to a sensible file size, for speed of use in the Sketchfab viewer, as well as to allow speedy downloads.
The solidify tool was used for that, with the sharp edge preserving setting allowing a sensible file size with minimal loss of the limited detail contained in the original scan. Meshmixer has a wide range of available tools that are very useful for processing 3D scans, including 3D sculpting brushes that are as good as those in many commercial sculpting packages. It also has good features for closing cracks, as well as translation, rotation and scaling. But I think probably the most useful is the tool for making a new solid, through remeshing.
However, if I had made the scan more recently I may have used Nomad Sculpt instead, as I find it easier to use for trimming and smoothing, as well as reconstructing poorly scanned areas. Also, it allows me to do the processing with a pressure-sensitive stylus any time, wherever I am, on my Android tablet. But, if I had, Meshmixer would still have been used afterwards, mostly due to the power of its sharp edge preserving remeshing tools. You can see the finished model on Sketchfab below (click the play button to load the model and view it in 3D).
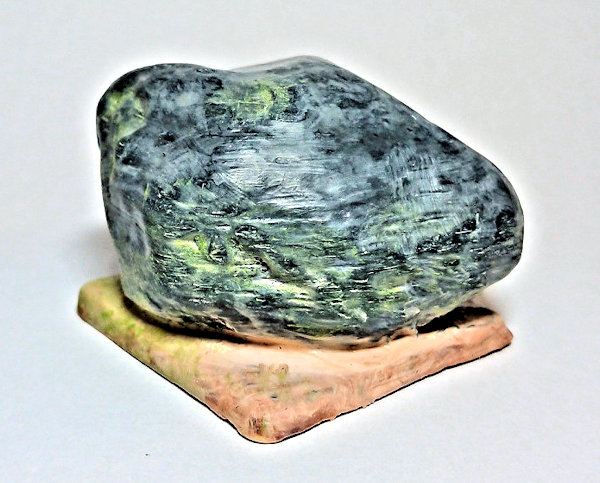
The finished model in the photo below was printed in PLA using an XYZPrinting DaVinci Jr printer. The printer did a good job of making a model for painting, and I managed it without using any support material (although the overhangs mean you may need minimal support on your printer). It was then painted with Pebeo craft acrylics, mostly as increasingly diluted washes in order to try to create a rock effect (in the same way that model railway rock scenery is painted).
After that it was given a coat of matt varnish which gives a controlled surface glossiness that seemed appropriate for a weathered rock. Since then I’ve found that The Army Painter paints can give some very nice stone effects, when used with their was medium. However, for this fused-filament print it was useful to use craft acrylics as it made hiding layer lines easier without resorting to high-build primers or resin printing. If you want to try 3D printing it yourself, click here to go to the MyMiniFactory page to download it.
So finally, in case you’d like to use the methods in this project for your own work, let’s recap on what was involved:
- The Sony 3DCreator Android app was used to create a basic 3D scan on a smartphone, which provided a good representation, albeit without the minor stone-surface features and marks.
- On a PC Meshmixer was used to tidy the 3D scan, including cutting away unwanted material, smoothing poorly scanned areas, and sharpening some edges.
- Meshmixer was also used to solidify/remesh the model, to achieve a much smaller file size, using the sharp edge preserving setting so as not to lose what fine detail was available in the original scan.
- The finished 3D model was then test printed in PLA and found to print to an acceptable quality.
- Due to the limited amount of detail in the final model, resin printing isn’t really necessary, although it should work well, especially for small prints.
Please note that this scan is provided without any license for commercial use. It is intended simply as a model you can have the fun of printing yourself. And of course it is intended to be a motivation for you to visit Birmingham’s Jewellery Quarter yourself to view the Warstone and maybe even buy you, or a loved one, some new jewellery: click here to see the location in Google Maps.


