
Contrary to it’s name, Beacon Hill Castle isn’t really a castle: it’s a monument and toposcope with stunning views from atop Lickey Hills just south of Birmingham in the English Midlands. It’s a popular area for outdoor relaxation and recreation for people in nearby Longbridge, Rednal, Rubery and Lickey and the ‘castle’ was erected in 1907 to commemorate the gifting of the land to the people of Birmingham by the Cadbury family (yes, the famous chocolate makers whose Cadbury factory can still be found a couple of miles north in Bournville). I’ve visited the area a number of times, including to scan the nearby ‘trig’ point benchmark plate, so obviously wanted to create a 3D model of the castle too. However, that would have been an enormous task with basic scanning equipment so, as there isn’t any need to capture all the fine detail for printing a small model, I decided to build a digital version from scratch instead.
Quick summary of this 3D creation
Overview: A 3D recreation of Beacon Hill Castle in Lickey Hills Country Park.
Location: Lickey Hills, Rubery, central England, United Kingdom [map].
Date/era: Reign of Edward VII, 1907.
Software used: LibreCAD, OpenSCAD.
Intended use: 3D printing with resin or fused filament printers, the latter being possible without support material if oriented correctly (larger prints would require support under the side arches).
A small plaque on the wall, to the left of the steps, reads “In 1907 three brothers Edward, George Jnr. and Henry Cadbury gave Beacon Hill to The City of Birmingham to protect the countryside and for people’s enjoyment“. Also, a plaque in front of the castle reads “Originally erected to commemorate the gift of this hill to the City of Birmingham in 1907 by Edward, George Jnr. & Henry Cadbury for use by the people of the City for leisure health and recreation. Restored and refurbished 1987-1988 by the MANPOWER SERVICES COMMISSION and BIRMINGHAM CITY COUNCIL DEPARTMENT OF RECREATION AND COMMUNITY SERVICES as an M.S.C. community project with support from the families of: EDWARD CADBURY and GEORGE CADBURY JNR.“
The 3D model was created by first taking accurate measurements using a Bosch bluetooth-enabled LASER distance meter and the excellent Android ImageMeter app for drawing the measurements onto photos. The measurements were then used to create outlines of the main building blocks in LibreCAD, which were used, after linear extrusion, to add and subtract material in OpenSCAD (see screenshot below) which exported the completed STL file.
I have to say I was very pleased with the model OpenSCAD produced. Obviously I have plenty of experience that tells me OpenSCAD produces excellent models, but seeing a castle form in it was a new, and rather enjoyable, experience for me. You can see the finished model on Sketchfab below (click the play button to load the model and view it in 3D).
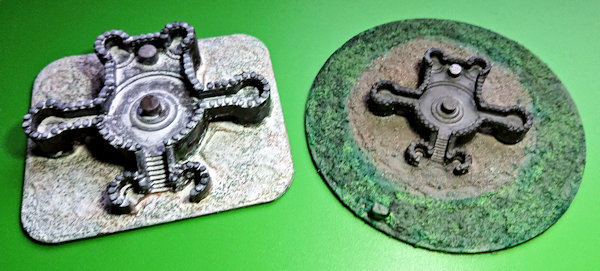
The example 3D prints in the photo below were made using a Monoprice Mini SLA resin printer. I was very pleased with the resin prints, which were less than 50mm across and so contained quite small details. The only details that didn’t come out as well as I’d hoped were the arrow slits in the walls. They were closed up with resin, which I think may also be due to my not using a stiff brush to clear away remaining liquid resin before final UV curing. The bases the castle models sit on were easily created using very simple OpenSCAD code, from 3D primitives, and when printed on a Monoprice Mini printer in PLA allowed me to make some mini dioramas. If you want to try 3D printing it yourself, click here to go to the MyMiniFactory page to download it.
Given that there aren’t many overhangs in the model that would require support material when fused-filament printing, I decided to use it as a test of my new Flashforge Adventurer 3C printer using their own PLA filament. You can see the result in the photo below, printed at low speed, and with thin layers, due to the small size. As the size meant that the arches under the side walkways were quite narrow, I actually managed to make this print with absolutely no support material, making it very easy to produce a finished fused-filament version. I was also rather surprised by the quality of the Flashforge printing as when I looked closely I could see very fine arrow slits in the walls. So I think it’s fair to say that this model can safely be used with fused-filament printers, with little or no support material depending on size.
The resin prints were painted using Pebeo craft acrylics and a coat of anti-shine varnish. Given the uniformity of the printed resin surface, other paints (such as The Army Painter or Citadel ones) would have worked just as well too. I wasn’t completely happy with the flatness of the areas around the castle and so decided that some texture would help. So I added some fine sand to create a rough stone surface and roughen it up a little (and in the winntery scene pushed against the walls to look like snow drifts). And for the version on the right of the photo I also added some modelling-scenery scatter grass: it’s the stuff sold for use on model railway scenes to add the look of rough grass.
I did that by mixing the sand and scatter grass with a small amount of Bostik all purpose glue and pressing it onto the model. That worked well, although it needed to be left to dry for a few hours to fully harden before painting. However, in more recent modelling I’ve also had good results simply by spreading gel-based superglue onto the print surface, then scattering the sand or ‘grass’ onto it, later tapping to remove the excess when the glue has fully dried. And it works well for creating other textures too, such as with fine sand to emulate a macadam path surface. I should also mention that PVA glue is widely used for adding surface texture around model railways, but on smooth printed resin surfaces I’ve found it can peel away easily later.
So finally, in case you’d like to use the methods in this project for your own work, let’s recap on what was involved:
- Key dimensions were first measured using a Bosch bluetooth-enabled LASER distance meter and the Android ImageMeter app.
- The shapes involved in the castle were then drawn to the accurate dimensions in 2D using LibreCAD, and saved as DXF files.
- OpenSCAD was then used to linear extrude the shapes in the DXF files into solid parts, and rotate/translate them to the correct places where necessary.
- The parts were then used with constructive solid geometry operators in OpenSCAD to add and remove material, starting with the basic castle shape, to build the finished 3D model.
- The finished 3D model was then test printed in resin and PLA, and found to print to an acceptable quality with both methods.
- As there are no significant overhangs in the model, it can be printed using fused-filament without support material (a minimal amount will be necessary for larger prints, to support the arches on the sides).
Please note that this model is provided without any license for commercial use. It is intended simply as a historical model you can have the fun of printing yourself that advertises this beautiful old structure. And of course it is intended to be a motivation for you to visit Lickey Hills yourself and, while ambling around the beautiful scenery, have a rest at this wonderful toposcope: click here to see the location in Google Maps.


