
One of the really great things about designing 3D models in Blender is that it allows you to use low polygon counts and yet render them as if they have much more detail. In fact, for many models, rendering a smoothed low-poly object can give nicer renders than using a higher polygon count. And it’s easier and quicker for Blender to render them too. So I thought I’d write a quick post about how to use smoothing in Blender, based on the 3D model of a shuttle in the Blender-render below (I used Blender v3 to design and render it).

As you can see, much of the model is flat, so a higher polygon count for most of the faces would just increase the complexity of the geometry with no improvement in rendering. But, some areas are rounded, with the render showing the quad faces they’re made up of. For many uses, such as aminating in Processing/P5, I wouldn’t be too worried about that. But, for high-quality rendering in Blender, it’s something that needs sorting. So the first step is, in object mode, we select an object we want to smooth and right-click it. The context menu below will then pop up, where we can select ‘Shade Smooth’.

Now you may expect some really useful outcomes from that step. In fact, for many models, with lots of rounded surfaces and not too many sharp edges, it may be all you have to do. But the reason I chose my shuttle model for this post was that it has a lot of sharp edges I didn’t want to lose. And as you can see in the image below, ‘Shade Smooth’ did an excellent job of making the shuttle look like it’s made of wax and has been left on a hot window sill for a while. Actually, it’s quite a nice special effect for some uses, but not for a straightforward render.

The problem isn’t, of course, with Blender: it has no idea what the model is supposed to look like, or which bits we want flat or curved. So to remedy our problem we need to be able to tell Blender how to decide which bits to smooth and which to ignore. Well, if you look to the right of the Blender window you’ll see the properties area you use for many other settings and modifiers. Near the bottom you’ll see the section marked by a green triangle with some circles. It’s the ‘Object Data Properties’ section and within it you can expand the ‘Normals’ dropdown where you’ll find a checkbox to select auto-smoothing, like in the screenshot below.

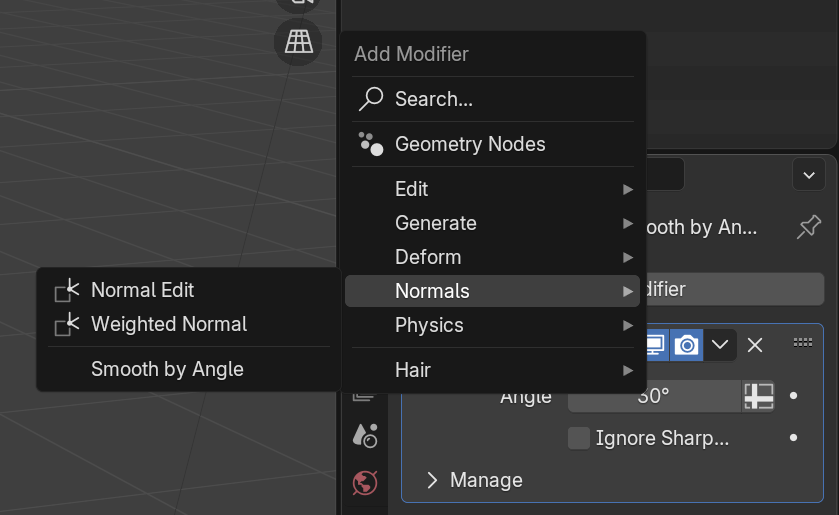
A quick update: Since versions of Blender 4.1 came out, the auto-smoothing box has been moved. So if you’re using an up to date version of Blender you now need to add a modifier (look for the little green spanner/wrench icon to open modifiers) and select ‘Smooth by Angle’ in the ‘Normals’ section. And it should be pretty much the same to use as in the older versions of Blender.
To the right of the checkbox there’s a box that allows you to set the angle used to determine what to smooth. If the angle betweens faces is less than this value the surface will be smoothed, simple as that. The default value of thirty degrees actually works quite well a lot of the time, although for things like small cylinders with few vertices around their cross-sections I’ve found forty, or even more, degrees to be needed. But the good thing is you can play with it until you get your render looking the way you want. And below you can see just how much my shuttle render is improved using auto-smoothing.

Personally I think that’s amazing, as you can’t see any artifacts of the flat quads on the rounded surfaces. Plus there’s no obvious loss of flatness in the rest of the model. And to better demonstrate that I’ve put a closer image of the original and auto-smoothed renders below, so you can see just how good the effect is on the rounded areas.

And basically that’s all there is to getting started with smoothed low-poly 3D models for rendering in Blender. I hope you find it as useful and fun as I did while learning how to do it 🙂


