
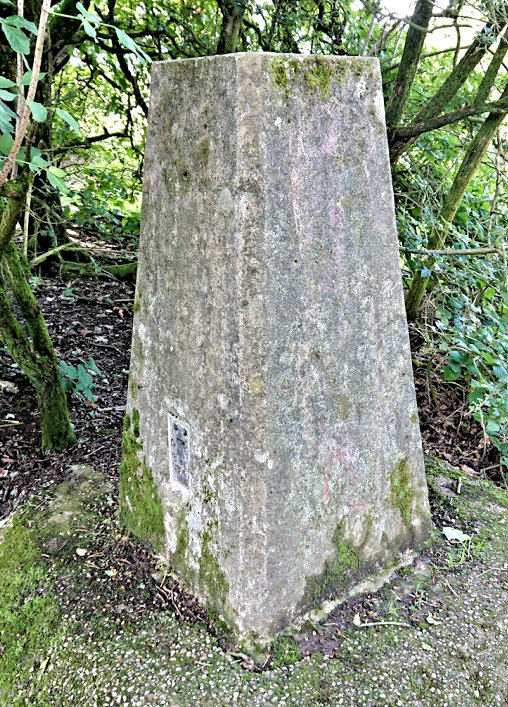
When people think of the built environment they often seem to think mostly of the architects that design famous buildings. But despite them being the glamorous characters, most of the infrastructure we live our lives within is actually largely the result of work by engineers, contractors and surveyors. So it can be nice to discover things around us, often hidden away, that document their mark on our landscapes. That was the case when I went to view the Ordnance Surveys’s benchmark plate on the trig (short for trigonometry) point at the top of Lickey Hills: in Birmigham UK, a short walk from the Beacon Hill Castle toposcope.
Quick summary of this 3D creation
Overview: A basic scan of the benchmark plate on the Ordnance Survey ‘trig’ point atop Lickey Hills near Rubery.
Location: Lickey Hills, Rubery, central England, United Kingdom [map].
Date/era: Unknown, but most likely second half of the 20th Century.
Software used: Sony 3DCreator Android app, Meshmixer.
Intended use: 3D printing, either in resin or fused filament, the latter being possible without any support material.
Trig points like this were located all over the UK and were used for surveying to make maps and engineering plans. These days many have disappeared, or fallen into disrepair, as use of GPS for land surveying makes them superfluous. So, I decided it was a wonderful opportunity to make a 3D scan of the benchmark plate for posterity, as well as to add it to my collection of historical object 3D prints.
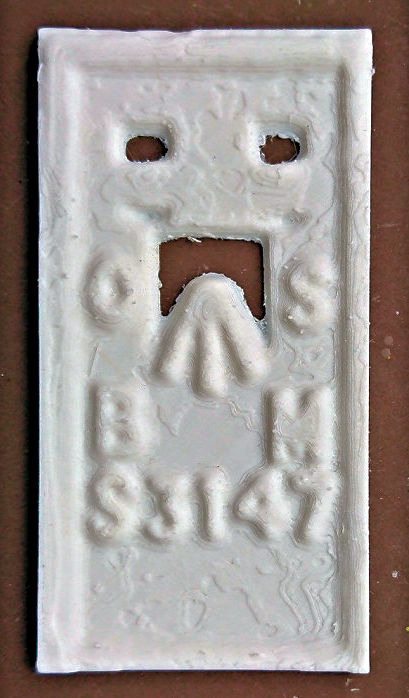
Like with many trig points the benchmark plate, which is used for determining height above sea level in surveys, is the Flush Bracket type, as it sat flush with the surface of the plinth or wall it was set into. The bracket part refers to the holes at the top into which a small metal bracket could be inserted that a levelling staff would sit on during surveying. That was a lot easier than using the much more common benchmarks carved into walls, where I remember we used to put a coin under the levelling staff to help locate it at the right height. If you’re interested, there’s some interesting information on benchmark types on the Heritage and History website.
The O and S on the plate refer to the Ordnance Survey and the B and M mean Bench Mark. The S3147 marking is the unique reference number for the trig point: click here to visit the trigpointing.uk page for full details of this trig point. And you may be interested to know that visiting trig points, and even logging those visits, is still a popular recreational pursuit for some people, as the trigpointing website attests to. So if you visit their site you’ll not only find details about peoples visits, but also plenty of interesting photos of the trig points they’ve listed.
The scan was done using the Sony 3D Creator app on an Xperia XZ1 Compact smartphone. It didn’t pick up all of the fine details but overall I’d still say it did a good job. Given that 3DCreator is free, I can’t expect completely detailed 3D scans from it, but it usually pleasantly surprises me with just how good it can be. And for quick and spontaneous 3D scanning it’s hard to beat: there’s no need to upload images to a photogrammetry server, nor to wait to see what emerges. If you don’t get a good scan you can see that’s the case straight away and try again.
The scan was then post-processed using Meshmixer to remove extraneous areas and to remesh to a sensible file size, for speed of use in the Sketchfab viewer, as well as to allow speedier downloads. The solidify tool was used for that, with the sharp edge preserving setting allowing a sensible file size with minimal loss of the limited detail contained in the original scan. Meshmixer has a wide range of available tools that are very useful for processing 3D scans, including 3D sculpting brushes that are as good as those in many commercial sculpting packages. And, while being provided by AutoDesk, the makers of widely used professional software such as AutoCAD, it’s also free to download and use. You can see the finished model on Sketchfab below (click the play button to load the model and view it in 3D).
The 3D printed version in the photo below was printed in PLA, without support material, using an XYZPrinting DaVinci Jr printer. It did a good job of creating a usable print around 90mm tall, although given the detail in the model a better, and possibly smaller, print could easily be made with a resin printer. However, which method you use depends on the quality of the finished model you want to achieve. And as most 3D printing enthusiasts don’t have a resin printer, I was quite happy that my fused-filament version came out well enough to add to my collection of historical 3D prints. And that was helped by the fact that, printed flat on the build plate, printing with filament didn’t require use of any support material that would mar the print surface and require annoying filing and sanding. If you want to try 3D printing it yourself, click here to go to the MyMiniFactory page to download it.
The print was later painted using Pebeo craft acrylics to give a dark metal effect, and then given a protective coat of matt varnish that had the added advantage of controlling shininess. Craft acrylics are quite thick, so they caused some loss of detail, although I wasn’t too concerned by that. Thinner paints (such as The Army Painter or Citadel ones) could have been a better option if I’d had my resin printer at the time, as resin layer lines are very fine and so easier to hide with thinner paints. But overall I was quite pleased with the result, and I think it turned out as well as I’d hoped for.
So finally, in case you’d like to use the methods in this project for your own work, let’s recap on what was involved:
- The Sony 3DCreator Android app was used to create a basic 3D scan on a smartphone, which provided a good representation, albeit with some loss of detail along sharp edges.
- On a PC Meshmixer was used to tidy the 3D scan, including cutting away unwanted material, smoothing poorly scanned areas, and sharpening edges.
- Meshmixer was also used to solidify/remesh the model, to achieve a much smaller file size.
- The finished 3D model was then test printed in PLA and found to print to an acceptable quality.
- Due to the level of detail in the final model, resin printing isn’t really necessary, although it should work well, especially for small prints.
Please note that this model is provided without any license for commercial use. It is intended simply as a historical model you can have the fun of printing yourself. And of course it is intended to be a motivation for you to visit Lickey Hills yourself and view this wonderful piece of industrial and engineering history while you’re there: click here to see the location in Google Maps.


