Personally, when not using a stereoscopic viewer, I prefer looking at 3D photos and videos in parallel-viewing format – that is, with the left eye view on the left and the right view to the right. It’s the format output by most stereo cameras and rendering apps, which makes parallel viewing quite convenient. But not everyone does that. Some people are just as passionate about crosseyed-viewing, where the left and right views are swapped over. So often I create a 2×2 grid when I post 3D photos online – the top images being a parallel stereo pair and the bottom a crosseyed pair.
And for video I’ve done similar things by combining FFmpeg and Python, allowing me to play with things like frame-by-frame compositing. So I wondered if it was possible to use FFmpeg to take a parallel side-by-side stereo video and convert it to that same sort of 2×2 grid, but directly with no intermediate steps or files. And it turned out to be much easier than I thought, once I’d spent some time reading up about FFmpeg complex filters.
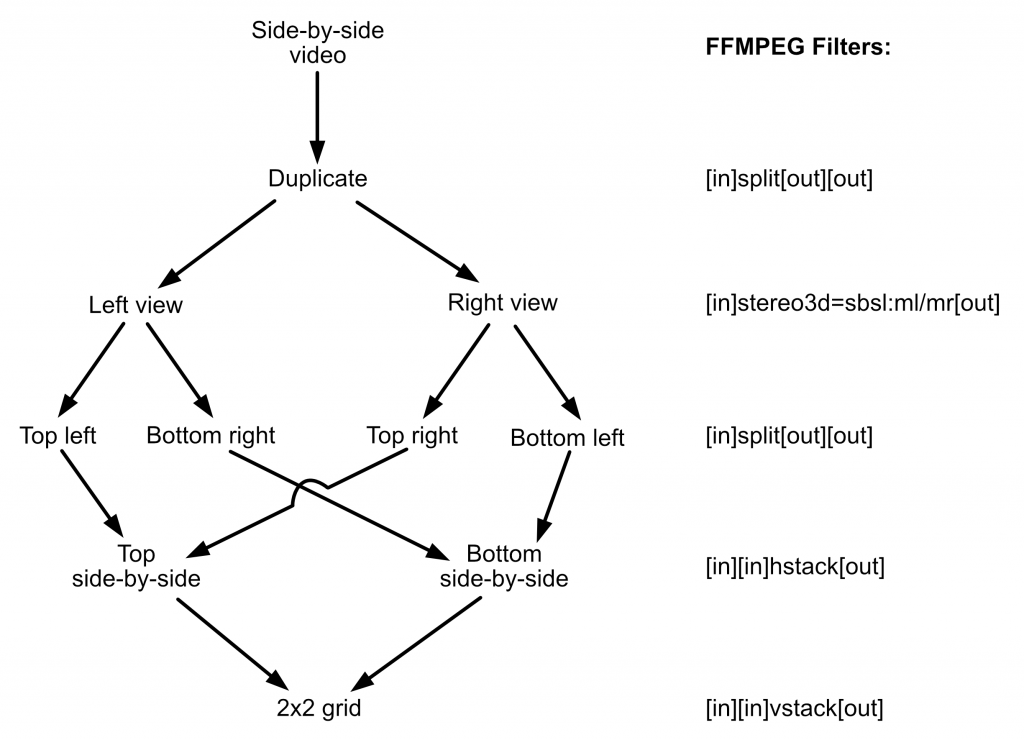
So first perhaps I should mention that FFmpeg can be run from the command line with you specify individual filters to apply to the input video. For example, you can use them to resize or crop a video. But more powerfully, they can also be connected together in a way that lets you do a number of parallel filter chains. So below I’ve put a diagram that illustrates the main filters required to create our 2×2 grid. Basically, for each frame, it involves making two versions, splitting a left or right frame from each, making duplicates of each, making a parallel and crosseyed stereo pair, then joining them into a grid.
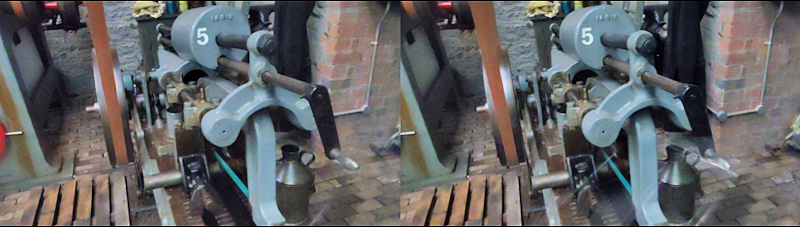
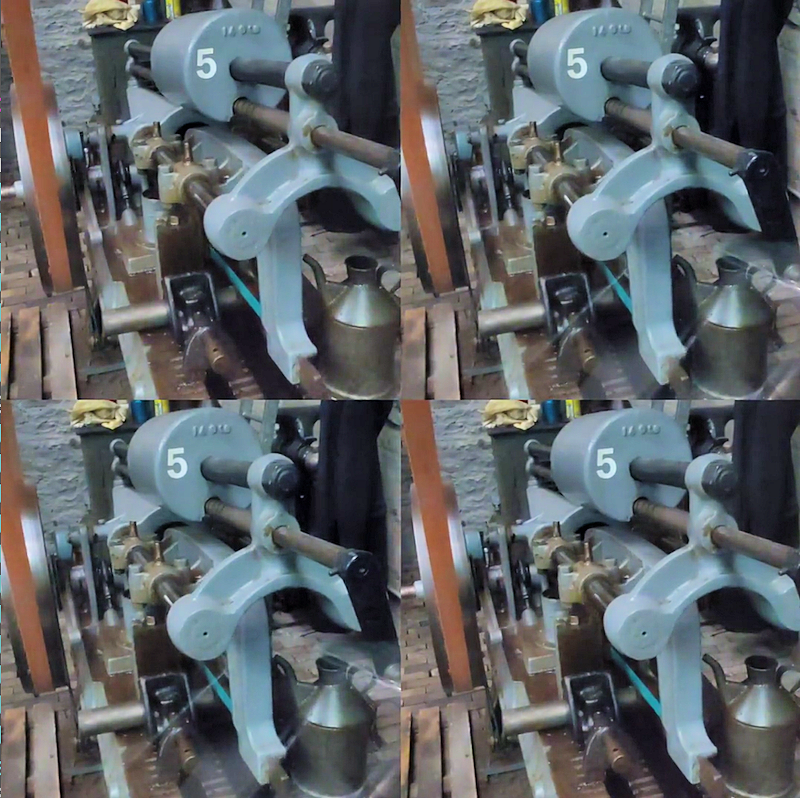
If you want to learn more about how the filters work, and how to chain them together, there’s some very good documentation on the FFmpeg website. You’ll find lots of other useful info on there too, although I won’t be covering much of it here except for the complex filters needed to create 2×2 grids. And to do that I’ll use a short video clip I took at the excellent STEAM museum in Swindon – a frame from it is shown below. It was shot on an Xreal Beam Pro as dual-1080p full HD video (i.e. 3840×1080 pixels) at 60 frames per second. But for your own purposes you can use any stereoscopic video clip you’ve got lying around.
To make our grid we need to use the “-filter_complex” parameter in our call to FFmpeg, including the individual filters described above separated by semicolons. I’ve put the text for that below. You’ll notice some tags in square brackets – they just give names to filter inputs and outputs that allow us to chain them, but note that an output name cannot be used as an input name more than once. The command is very simple, it just makes our 2×2 grid twice as wide and twice as high as the original (e.g. 1080p becomes 4k).
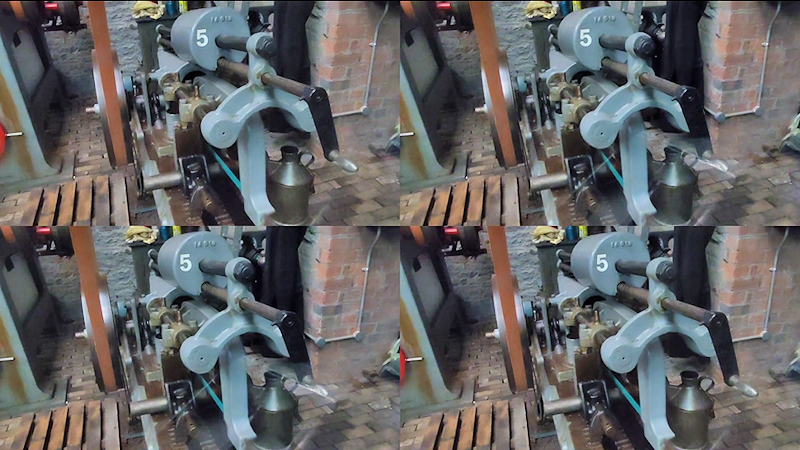
ffmpeg -i in.mp4 -filter_complex "[0:v]split[sl][sr];[sl]stereo3d=sbsl:ml[fl];[sr]stereo3d=sbsl:mr[fr];[fl]split[tl][br];[fr]split[tr][bl];[tl][tr]hstack[top];[bl][br]hstack[bottom];[top][bottom]vstack" outgrid.mp4If, like me, you want to remove the original audio, you can do it by adding “-an” as a parameter just before the output file name. And when you run the command the output video should look something like the screengrab I made below. The top is a parallel-viewing stereo pair and the bottom is the same pair but swapped over for crosseyed viewing. You may have noticed we use the split filter a few times – slightly confusingly it doesn’t actually split the image, it just duplicates it into two images to get over the requirement not to use an output name for more than one filter input.
Of course, that’s all we need to do to create the grid, but maybe we don’t want the output video to have four times as many pixels as our input. So below is how I changed the FFmpeg command to add a resize filter to the end that reduces it to 1080p. Of course, it may be faster to add (perhaps with the comma chaining method described in the FFmpeg docs) resizing to the stereo3d lines, to make them half frame width and height, rather than at the end. But a single resize at the end seems clearer to read and for a short video clip it runs pretty fast.
ffmpeg -i in.mp4 -filter_complex "[0:v]split[sl][sr];[sl]stereo3d=sbsl:ml[fl];[sr]stereo3d=sbsl:mr[fr];[fl]split[tl][br];[fr]split[tr][bl];[tl][tr]hstack[top];[bl][br]hstack[bottom];[top][bottom]vstack[grid];[grid]scale=1920:1080" outsameaspect.mp4Another thing I like to do sometimes is crop my left and right eye views so I can make a 2×2 grid that is square. So below I’ve put the FFmpeg command changed to crop each view square using inline math in the filter (“crop=in_h:in_h:in_w/2-in_h/2:0” where in_w and in_h are the dimensions of the input video frame). Note that the overall scaling at the end obviously needs amending too, as the aspect ratio is different to before.
ffmpeg -i in.mp4 -filter_complex "[0:v]split[sl][sr];[sl]stereo3d=sbsl:ml[flt];[sr]stereo3d=sbsl:mr[frt];[flt]crop=in_h:in_h:in_w/2-in_h/2:0[fl];[frt]crop=in_h:in_h:in_w/2-in_h/2:0[fr];[fl]split[tl][br];[fr]split[tr][bl];[tl][tr]hstack=inputs=2[top];[bl][br]hstack=inputs=2[bottom];[top][bottom]vstack=inputs=2[grid];[grid]scale=1080:1080" outsquare.mp4And below is a frame from the output video. And if you want to crop in a slightly different way hopefully the command will help you work that out too.
And that’s all we need to know for a basic conversion of a parallel-viewing stereoscopic video clip to a 2×2 grid, for easy equipment-free 3D viewing by anyone who enjoys it. Of course, I haven’t covered other things you may want to know, like how to change the frame rate, the codecs or the image quality – you can read all about that on the FFmpeg docs if you wish. But I hope you enjoyed getting started with FFmpeg complex filters for stereoscopic video making 🙂


