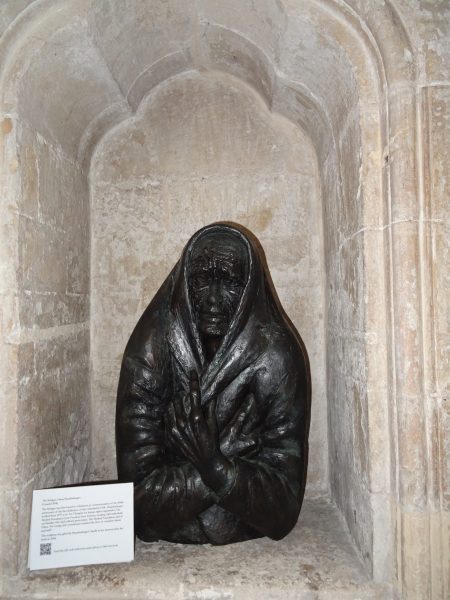
As long as there is war, hunger and greed in our world there will likely always be refugees. And that’s definitely the case these days, with new news reports of refugees trying to flee famine and war zones seeming almost a daily occurrence. So it’s good to remember that people have worked to help those displaced people for as long as there have been refugees in need of aid. A poignant reminder of that is The Refugee, a wonderful sculpture created by Diana Brandenburger and donated to Chichester, by her family, on her death in 2008. You can visit it at Chichester Cathedral in the South of England where it is on display. So, when I visited the cathedral and saw it, I knew it was a wonderful opportunity to make a 3D scan to print, and which hopefully would help a precious piece of art gain a wider audience.
Quick summary of this 3D creation
Overview: A basic 3D scan of The Refugee, a sculpture created by Diana Brandenburger, in Chichester Cathedral in southern England.
Location: Chichester Cathedral, Chichester, southern England, United Kingdom [map].
Date/era: Second half of 20th Century, exact date unknown.
Software used: Sony 3DCreator Android app, Nomad Sculpt Android app, Meshmixer.
Intended use: 3D printing, either in resin or fused filament, the latter requiring very little, if any, support material.
The information displayed with the sculpture reads ‘The Refugee was first loaned to Chichester, in commemoration of the 900th anniversary of the first dedication of the cathedral in 1108. Brandenburger worked from 1977 as an Art Therapist for human rights organisation The Medical Foundation (now Freedom from Torture), working with individuals and families who had suffered persecution. The Medical Foundation said of Diana, “her energy and commitment enriched the lives of countless clients and staff”‘. So not only is it a lovely piece to view, but also you can see it as an excellent memorial to an artist with a conscience and the will to help refugees.
The scan was made with the Sony 3DCreator app on an Xperia XZ2 phone, which did an excellent job of the scanning, mostly only losing detail in the creases and folds of the clothes. The 3D scan was then imported into the Nomad Sculpt Android app where it was properly oriented, poorly scanned areas tidied, and edges sharpened using the crease tool with a small radius. Despite being intended as a 3D sculpting application, Nomad Sculpt has proven an excellent tool for processing and tidying up 3DCreator scans, as it has many tools for trimming, sculpting and smoothing, as well as a gizmo tool to help you translate, scale and rotate. It was used on a Samsung Galaxy Tab S6 Lite Android tablet as it has a pen/stylus that works very well with the pressure sensitivity feature of Nomad Sculpt, allowing easy and sensitive adjustments to be made.
The model was then post-processed using Meshmixer to remesh to a sensible file size. That was very important as the need to use a high polygon count in Nomad Sculpt, in order to carve out fine details and sharp edges, results in a large file size. That may not seem too important for 3D printing, but a smaller file size loads faster in the Sketchfab viewer, and also allows for quicker downloads of 3D model files to print. And, after sharpening edges in Nomad Sculpt, there was little loss of fine details after remeshing, which was helped by using the Meshmixer sharp edge preserving setting. You can see the finished model on Sketchfab below (click the play button to load the model and view it in 3D).
The small painted print in the photo below was then made using a Monoprice Mini SLA printer with Elegoo water washable resin. As I’ve found that water-based UV resin can sometimes cause some softening of sharp features, I was quite pleased by the results: a little loss of sharpness on the nose being the only real issue I found compared to the original digital version. The larger one, on the left of the photo, was printed in Flashforge PLA, oriented upright on one of their Adventurer 3C printers with no support material apart from a minute amount the slicer decided to put under one of the arms. I wanted to see how it would print in fused-filament, as compared to resin, and I think it turned out very well indeed. In fact, unless you want a very detailed, and quite small, 3D print I think fused-filament printing would be good enough for most purposes. If you want to try 3D printing it yourself, click here to go to the MyMiniFactory page to download it.

The resin version was given a coat of The Army Painter brush on primer, which I like as it’s easy to use, smooths away layer lines a little, and helps ensure the later coats of paint adhere well. It was then given a coat of Revell black model paint, as it gives a good black look and is quite thin so doesn’t cause too much loss of detail. I then gave it a couple of coats of Citadel Technical Stormshield clear varnish, just to help prevent it looking too glossy. I think that turned out well as, even though it was a very simple paint job, it does look a lot like the original.
So finally, in case you’d like to use the methods in this project for your own work, let’s recap on what was involved:
- The Sony 3DCreator Android app was used to create a basic 3D scan on a smartphone, which provided a good representation albeit with some softening of sharp details.
- The scan was post-processed in Nomad Sculpt on an Android tablet, to correctly orient it, cut away excess material, smooth poorly scanned areas, and restore sharp edges using the crease tool.
- On a PC Meshmixer was used to solidify/remesh the model, to achieve a much smaller file size with minimal loss of detail.
- The finished 3D model was then test printed in resin and PLA, and found to print to an acceptable quality with both material types.
- Despite the detail in the final model, resin printing wasn’t found to be the most appropriate method, as fused-filament printing with no support material also produced good results.
Please note that this scan is provided without any license for commercial use. It is intended simply as a pilgrim souvenir from Chichester Cathedral you can have the fun of 3D printing yourself. And of course it is intended to be a motivation for you to visit the beautiful Chichester Cathedral yourself and, while soaking up the culture, take a look at this wonderful, and poignant, work of art: click here to see the location in Google Maps.


