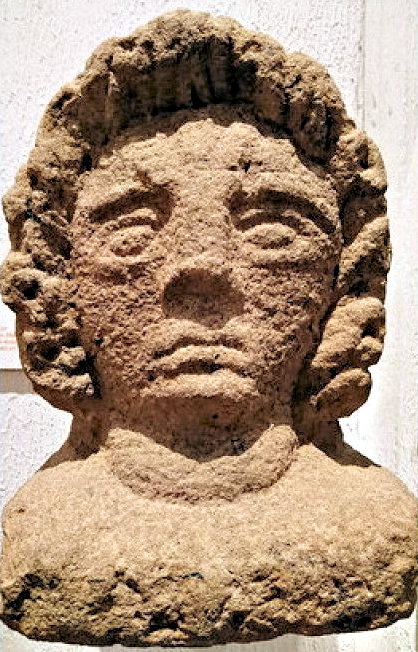
Caerleon is a very important Welsh town, being well known for its’ Roman heritage including the remains of an amphitheatre, a barrack block and a bathhouse. In fact, it was one of the bases for the Second Augustus Legion (Legio II Augusta – click here for the Wikipedia page) after it played its’ part in the Roman invasion of Britain. So it’s unsurprising that the museums there have many wonderful roman artifacts, including this representation of Attis at the excellent National Roman Legionary Museum in Caerleon, South Wales. And having my smartphone with me, and the Sony 3DCreator app ready to go, I obviously would have been mad to miss the opportunity to make a 3D scan I could print into a model to display with my other historic prints.
Quick summary of this 3D creation
Overview: A basic scan of a representation of Attis in Caerleon’s National Roman Legionary Museum.
Location: National Roman Legionary Museum, Caerleon, South Wales, United Kingdom [map].
Date/era: Roman, exact date unknown.
Software used: Sony 3DCreator Android app, Meshmixer.
Intended use: 3D printing, either in resin or fused filament, the latter being possible without any support material.
The Cult of Attis was apparently very common, especially in terms of funerary rites, in Roman times (for example, click here to see a similar carving in Lancaster City Museum). According to Wikipedia, the Attis cult started as long ago as 1250 BC in what is now Turkey. He is said to have been sent to Pessinos to marry the daughter of the king. But, as Wikipedia tells us (Agdistis being an ancient Greek deity) ‘Just as the marriage-song was being sung, Agdistis / Cybele appeared in her transcendent power, and Attis went mad and cut off his genitals. Attis father-in-law-to-be, the king who was giving his daughter in marriage, followed suit, prefiguring the self-castrating corybantes who devoted themselves to Cybele. But Agdistis repented and saw to it that the body of Attis should neither rot at all nor decay‘. So overall, it seems a rather gory story.
The scan was made with the Sony 3D Creator app on an Xperia XZ1 Compact smartphone. Fortunately, the exhibit was set on a wall at head height with good lighting, so it was easy to get to, and move the camera around, to get a complete scan. Using 3DCreator obviously means the scan doesn’t contain small details, largely because the object has limited surface texture for use with photogrammetry scanning methods. But overall 3DCreator did do a very good job of representing the shape and form as a record for posterity. And, given that 3DCreator is provided free by Sony, and is easy and quick to use, I don’t really think I can complain, especially as the result was definitely good enough for me to make a nice 3D print to display.
The scan was then post-processed using Meshmixer to remove extraneous areas and to remesh to a sensible file size for speed of use in the Sketchfab viewer, as well as to allow speedy downloads. The solidify tool was used for that, with the sharp edge preserving setting allowing a sensible file size with minimal loss of the limited detail contained in the original scan. If I’d done the scanning more recently, I think I would also have used Nomad Sculpt, before Meshmixer, as the pressure-sensitive tools (when used with a tablet computer with a pen/stylus) would allow for much better sharpening around the edges of features (using the crease tool with a small radius). You can see the finished model on Sketchfab below (click the play button to load the model and view it in 3D).
The finished version in the photo below was printed in PLA using an XYZPrinting DaVinci Jr printer and I think the result was quite pleasing. Obviously printing in fused-filament caused some loss of the details the original digital version contained, but not to the extent that I feel it would be better printed in resin. However, there seems no reason not to print in resin if you prefer, and for small prints would obviously be a sensible option. And, the good news is that the model has no sharp overhangs so, if printed with the back flat on the build plate, fused-filament printing shouldn’t require use of any support material or its annoying removal. If you want to try 3D printing it yourself, click here to go to the MyMiniFactory page, or here for the Thingiverse page, to download it.
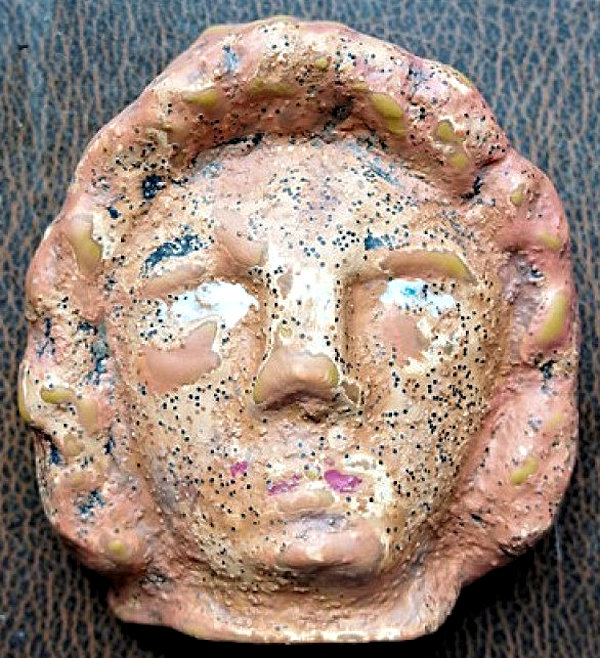
The 3D printed PLA model was painted using Pebeo craft acrylics, with washes added at increasing dilutions, to give a stone effect. I also decided to add a little fine black glitter, for a bit of extra stone texture effect, although I’m not sure that worked as well as I’d hoped. But overall I wanted an old and worn effect, when viewed from a distance, so was happy with the result even if it looks a little odd in the photo. It was then given a couple of protective coats of Pebeo matt craft varnish that had the added advantage of controlling shininess.
The varnish coats were also important because I wanted to hang the finished print outside to see how it stood up to the elements. In fact, it’s been hanging on a west-facing trellis outdoors for over three years now, and it still looks as good as when it was first placed there. For me that’s important to know because PLA is biodegradable and so not that useful for use outside: but it seems the paint and varnish help minimise any such problems.
So finally, in case you’d like to use the methods in this project for your own work, let’s recap on what was involved:
- The Sony 3DCreator Android app was used to create a basic 3D scan on a smartphone, which provided a good representation albeit with loss of sharp edge details.
- On a PC Meshmixer was used to cut away unwanted material and solidify/remesh the model to achieve a much smaller file size.
- The finished 3D model was then test printed in PLA and found to print to an acceptable quality.
- As there isn’t an enormous amount of detail in the model, resin printing wasn’t considered necessary but could be useful for small prints.
Please note that this scan is provided without any license for commercial use. It is intended simply as a historical model you can have the fun of printing yourself that advertises this ancient piece of art. And of course it is intended to be a motivation for you to visit Caerleon’s National Roman Legionary Museum yourself and, while perusing their excellent exhibits, view this wonderful roman representation of Attis: click here to see the location in Google Maps.


