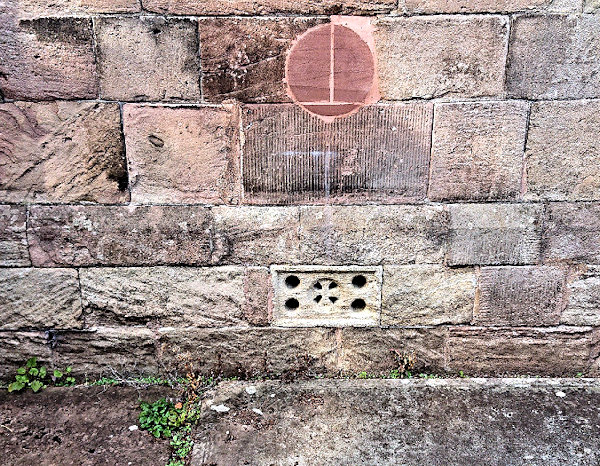
Old buildings, like churches for instance, often have very interesting architectural features. While you might have seen many such features, it’s perhaps much less likely that you’ll have seen some of the small features intended for functional purposes. A good example of that is the hymble air brick, which is basically a brick (or block) with holes to allow air to circulate in walls, thus reducing damp. But sometimes they can be quite ornate and become a part of the historic importance of the church in their own right. So it was nice to find this late Victorian air brick in the walls of St Mary’s Priory Church in Monmouth, South Wales. It’s one of many in the walls, which appear to be carved from a soft stone that has suffered quite a lot over the years. So, as it’s continually eroding away I decided to try 3D scanning it to save it for posterity, as well as for use in a bit of fun 3D processing and printing.
Quick summary of this 3D creation
Overview: A basic scan of a carved stone air brick, one of a number in the same style set into the walls of St Mary’s Priory Church in Monmouth.
Location: St Mary’s Priory Church, Monmouth, South Wales, United Kingdom [map].
Date/era: Late Victorian, probably circa 1882.
Software used: Sony 3DCreator Android app, Meshmixer.
Intended use: 3D printing, either in resin or fused filament, the latter being possible without any support material.
The air brick is, of course, an integral aspect of the architecture of St Mary’s Priory Church, so it’s interesting to note something of its history for context. According to the Monmouth Civic Society, from their blue plaque on the church wall nearby, dated 2008, we can find ‘St Mary’s Priory Church was dedicated in 1101 by Bernard, Chaplain to Henry I, in the presence of Gwethenoc, the founder, and Abbot William of Saumar in Anjou. The church was rebuilt in 1882, retaining Norman remains and the 14th century tower.‘ So not only is the air brick an interesting item from Victorian building construction, it can also be considered interesting in terms of its part in continuation of a church off Whitecross Street, in Monmouth, since the 12th Century.
The scan was done with the Sony 3D Creator app on an Xperia XZ2 smartphone. While the scanned air brick was also quite eroded, it was chosen as one that had suffered the least and so can be considered more representative of the original design. It’s easy to find and is on the north side of the church, not far from the Charles Heath memorial. 3DCreator did a good job of representing the shape and form to record the air brick for posterity. Obviously it didn’t manage to capture the very fine details, like the surface texture of the stone, but I was very happy that it managed to provide a good re-creation of the look and form of the original, which makes the scan well worthwhile for adding to a collection of architectural 3D prints.
The scan was then post-processed using Meshmixer to remove extraneous areas and to remesh to a sensible file size for speed of use in the Sketchfab viewer, as well as to allow speedy downloads. The solidify tool was used for that, with the sharp edge preserving setting allowing a sensible file size with minimal loss of the limited detail contained in the original scan. You can see the finished model on Sketchfab below (click the play button to load the model and view it in 3D).
The example 3D print in the photo below was made using a Monoprice Mini SLA resin printer, using standard UV-curing resin, and I think it came out very well despite being only 30mm long. However, there are no sharp overhangs that would result in annoying removal of support material, when fused-filament printing, if the back is flat on the print bed. Therefore, resin printing isn’t really necessary for you to do a good 3D print, although for mine the small size made it a much better option so as not to lose too much detail. If you want to try 3D printing the air brick yourself, click here to go to the MyMiniFactory page to download it.
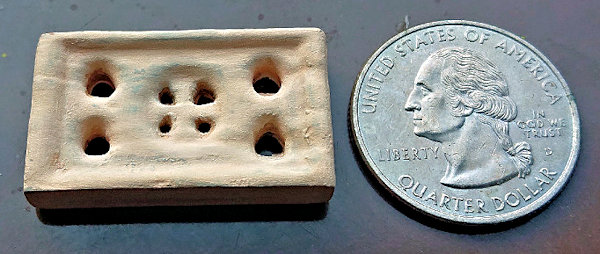
It was then painted with Pebeo craft acrylics and given a coat of matt varnish to control shininess. Craft acrylics are quite thick, so they caused some loss of detail, although I won’t be viewing it very closely so wasn’t too worried about that. Thinner paints (such as The Army Painter or Citadel ones) could have been a better option as resin layer lines are very fine and so easier to hide with thinner paints. Also, as for example with my scan of the pilgrim sculpture in Droitwich Spa, I’ve found that The Army Painter paints, when used with their wash medium, can give quite nice stone effects on resin, so if I made another print of the air brick I would probably try that instead.
So finally, in case you’d like to use the methods in this project for your own work, let’s recap on what was involved:
- The Sony 3DCreator Android app was used to create a basic 3D scan on a smartphone, which provided a good representation albeit with loss of detail on sharp edges.
- On a PC Meshmixer was used to tidy the 3D scan, including cutting away unwanted material, smoothing poorly scanned areas, and sharpening edges.
- Meshmixer was also used to solidify/remesh the model, to achieve a much smaller file size, using the sharp edge preserving setting to minimise loss of fine details.
- The finished 3D model was then test printed in resin and found to print to an acceptable quality.
- Due to the limited amount of detail in the final model, and the ability to print without support material, fused-filament 3D printing can also be considered a good option for larger prints.
Please note that this model is provided without any license for commercial use. It is intended simply as a historical model you can have the fun of printing yourself. And of course it is intended to be a motivation for you to visit Monmouth, and if you’re interested see the air brick too (it’s close to the museum as well, so why not visit there while you’re at it): click here to see the location in Google Maps.

