Cardiff Bay, in South Wales, has changed a lot in recent decades and is now a beautiful destination for local work, rest and play, as well as a popular tourist attraction for visitors to and from Wales. It is home to the Wales Millennium Theatre, the Senedd (Welsh Assembly), shops and restaurants, plus you can walk around the bay or even view it from a water taxi. Despite the changes though, it still has a lot of historic features, the beautiful red Pierhead Building being one of the main ones. It was originally the headquarters of the Bute Dock Company and was a replacement for the previous one after it burnt down. The glazed terracotta blockwork of the facade, in a wonderful red colour, includes many matching terracotta tiles, many of which depicting the Welsh Dragon. This scan is of one of them: a red clay double Welsh Dragon tile.
Quick summary of this 3D creation
Overview: A basic scan of one of the red glazed terracotta Welsh Dragon tiles on the Pierhead Building in Cardiff Bay.
Location: Pierhead Building, Cardiff, South Wales, United Kingdom [map].
Date/era: Victorian, circa 1897.
Software used: Sony 3DCreator Android app, Meshmixer.
Intended use: 3D printing, either in resin or fused filament, the latter being possible without any support material.
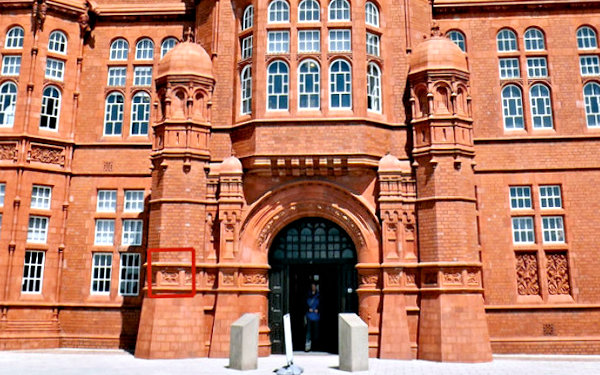
According to Wikipedia the Pierhead Building was built in 1897 with a French-Gothic Renaissance theme, so the tiles are a nice example of Victorian architectural embellishment, as well as being an important part of Welsh architectural history. And I decided they could also be a nice bit of Welsh history to have hanging on your wall, which was my motivation for this project. There are a few such terracotta tiles on the building facade, but the double dragon ones seemed a nice subject for 3D scanning. The location of the one I chose to scan was to the left of the main entrance, shown in a red box in the photo above. Fortunately, the tile was close to head height, so there was no difficulty getting to it for the scanning work.
The scan was done with the Sony 3D Creator app on an Xperia XZ1 Compact smartphone, which did a very good job getting a representative shape, even though the surface was shiny and had little detail to aid photogrammetry. It was then post-processed using Meshmixer to remove extraneous areas and to remesh to a sensible file size. The remeshing was done using the solidify tool in Meshmixer, using the sharp edge preserving setting so that not too much detail was lost. And the smaller file size is very useful for web use as it allows the Sketchfab viewer to work faster, and downloads to be speedier. You can see the finished model on the Sketchfab viewer below (click the play button to load the model and view it in 3D).
The 3D printed version in the photo below was then printed in PLA using an XYZPrinting DaVinci Jr printer, with their filament and without any support material due to printing it with the back flat on the print bed. It did a good job of creating a usable print, although given the detail in the model a better print could be made with a resin printer. It was then painted with Plastikote enamel to give a smooth and slightly shiny finish. Although the colour isn’t quite the same as the Pierhead Building, it is a nice red to represent the Welsh Dragon and I was quite pleased with the outcome of this project.
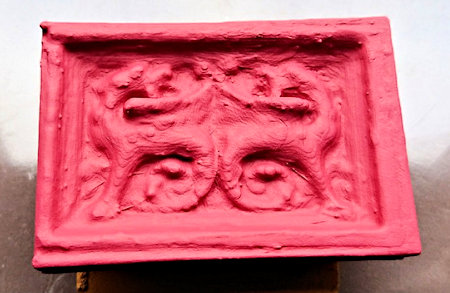
Using enamel paints was considered a good option in order to try to get a dense-looking finish, a bit like terracotta. However, other paints, such as those from The Army Painter and Citadel, or even craft acrylics, should work just as well too. Also, due to the visible layer lines in the photo, a high-build primer would have helped smooth the fused filament surface. However, that would also have resulted in even less detail, so the print was not primed. But, unless you look from close up, the layer lines don’t significantly detract from the look of the tile.
For those reasons, the model was also subsequently printed on a Monoprice Mini SLA printer with standard UV-cured resin: at 35mm long it printed well and with detail better than the much larger PLA 3D print. The resin version was finished off in red Humbrol model paint which proved a good option as it gave a nice finish and was not thick enough to cause too much additional loss of detail. If you want to try 3D printing it yourself, click here to go to the MyMiniFactory page, or here for the Thingiverse page, to download it.
So finally, in case you’d like to use the methods in this project for your own work, let’s recap on what was involved:
- The Sony 3DCreator Android app was used to create a basic 3D scan on a smartphone, which provided a good representation, albeit with some loss of sharp detail.
- On a PC Meshmixer was used to tidy the 3D scan, including cutting away unwanted material, smoothing poorly scanned areas, and sharpening edges.
- Meshmixer was also used to solidify/remesh the model, to achieve a much smaller file size, using the sharp edge preserving setting so as not to lose what fine detail was available in the original scan.
- The finished 3D model was then test printed in PLA, and subsequently in resin, and found to print to an acceptable quality, although resin printing resulted in a more detailed print even at smaller sizes.
Please note that this scan is provided without any license for commercial use. It is intended simply as a model you can have the fun of printing yourself. And of course it is intended to be a motivation for you to visit Cardiff Bay and, while soaking up the culture and history, walk over to the Pierhead Building and see the tile yourself: click here to see the location in Google Maps.


