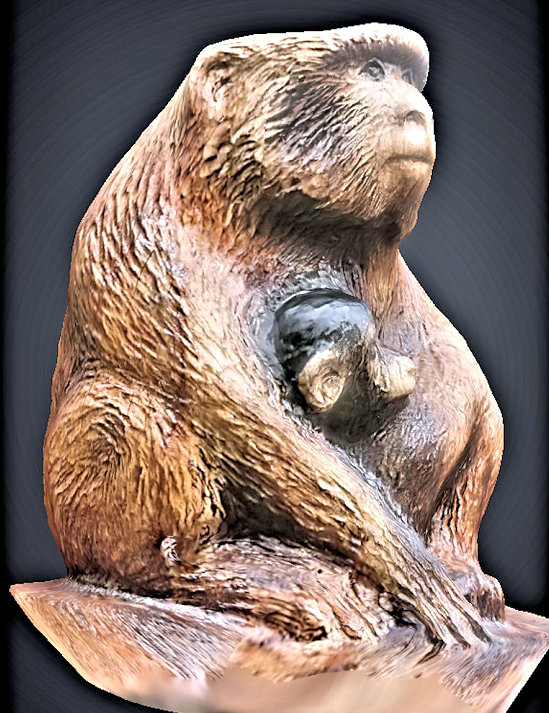
The United Kingdom has many wonderful tourist attractions and some of the best are based around nature. One of those attractions is the excellent Trentham Monkey Forest, just outside Stoke-on-Trent in England. And it’s not one of those places where you have to watch the animals staring soulfully at you from behind the bars of a cage: they have a whole forest to live in and you can wander around it seeing the monkeys in the trees and on the ground. In fact you can get quite close to them as they wander past, especially at feeding times, although of course you aren’t allowed to touch them. While there in May 2018 I noticed a small carving, cut from a tree trunk, depicting a monkey with baby, close to the entrance. Obviously timber carvings don’t last forever outdoors so I decided to try 3D scanning it, hopefully to preserve it for posterity.
Quick summary of this 3D creation
Overview: A basic scan of a carved timber monkey with baby at Trentham Monkey Forest near Stoke-on-Trent.
Location: Trentham Monkey Forest, Stoke-on-Trent, England, United Kingdom [map].
Date/era: Modern, circa 2018.
Software used: Sony 3DCreator Android app, Meshmixer.
Intended use: 3D printing, either in resin or fused filament, the latter being possible without any support material.
The scan was done with the Sony 3D Creator app on an Xperia XZ1 Compact smartphone. It did a good job getting a representative shape, but obviously the fine detail in the wood, as seen in the photo above, wasn’t captured at all as it was too shallow for 3DCreator. However, the point of the 3D scan was to recreate the power and experience of this beautiful piece of art, and ensure it stays with us even when the original has rotted away under the elements in the open air. So, as I wasn’t trying to create an accurate scan for history study, I was actually quite happy with the outcomes of this project. 3DCreator continues to amaze me with the ease of creation, and quality, of its 3D scans and I can definitely say it didn’t disappoint with this scan of the wood-carved monkey and baby.
The scan was then post-processed using Meshmixer to remove extraneous areas and to remesh to a sensible file size, for speed of use in the Sketchfab viewer, as well as to allow speedier downloads. The solidify tool was used for that, with the sharp edge preserving setting allowing a sensible file size with minimal loss of the limited detail contained in the original scan. Meshmixer has a wide range of available tools that are very useful for processing 3D scans, including 3D sculpting brushes that are as good as those in many commercial sculpting packages. And, while being provided by AutoDesk, the makers of widely used professional software such as AutoCAD, it’s also free to download and use. You can see the finished model on Sketchfab below (click the play button to load the model and view it in 3D).
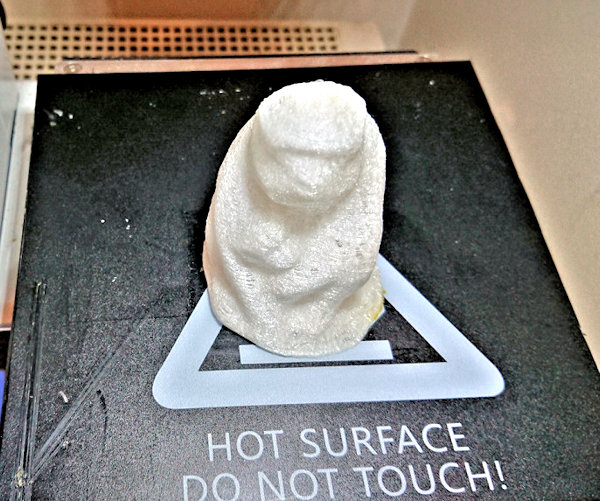
The 3D printed version in the photo below was printed in PLA using an XYZPrinting DaVinci Jr printer which did a good job of creating a usable print for painting. As it was printed vertically off the print bed (as the photo shows), and because there are no sharp overhangs in the model, it printed without any support material. So, if you’re annoyed with the difficulties removing supports, and cleaning up the printed surfaces afterwards, this may be a good model for you to try printing. And given the fused-filament result, and the limited detail in the model, a better print using a resin printer only seems necessary if you want a very small print. If you want to try 3D printing it yourself, click here to go to the MyMiniFactory page to download it.
I later painted the print using Pebeo craft acrylics and a coat of anti-shine varnish. Given the uniformity of printed resin surfaces, other paints (such as The Army Painter or Citadel ones) would work just as well too, if you do a resin 3D print. However, for fused-filament printing craft acrylics have the advantage of being thicker, so are much better at hiding layer lines. Of course, I could have used a high-build primer for thinner paints, but decided the acrylics would be a better alternative so as to minimise loss of the limited detail. Obviously there are no hard and fast rules on how you should paint your 3D prints, but it is useful to consider how different methods relate to the method of 3D printing used.
So finally, in case you’d like to use the methods in this project for your own work, let’s recap on what was involved:
- The Sony 3DCreator Android app was used to create a basic 3D scan on a smartphone, which did a good job reproducing the complex shapes, although fine detail wasn’t captured.
- On a PC Meshmixer was used to tidy the 3D scan, including cutting away unwanted material, smoothing poorly scanned areas, and sharpening edges.
- Meshmixer was also used to solidify/remesh the model, to achieve a much smaller file size, using the sharp edge preserving setting so as not to lose what fine detail was available in the original scan.
- The finished 3D model was then test printed in fused-filament PLA and found to print to an acceptable quality.
- Resin should also be a good option for the 3D printing, although due to the limited amount of detail in the final model, and the ability to fused-filament print without support material, there isn’t any real advantage in doing so unless you want a very small print.
Please note that this scan is provided without any license for commercial use. It is intended simply as a model you can have the fun of printing yourself. And of course it is intended to be a motivation for you to visit Trentham Monkey Forest yourself: click here to see the location in Google Maps.


