
To the side of Bath Abbey, in western England, stands a statue and fountain called the Rebekah Fountain, also known as ‘Rebecca at the well’. It therefore likely represents the Biblical Old Testament story of the test to find a wife for Isaac, in which Rebecca was chosen after providing water to a servant and his camels (see the Wikipedia page for more information).
According to Historic England the fountain is made of white marble and was donated by Bath Temperance Association in 1861. Visitors to Bath will most probably have seen it, likely even have taken tourist photos of it, but perhaps few will have looked closely and seen the small, and much more modern, water fountain set into it, which this scan attempts to provide a basic representation of.
Quick summary of this 3D creation
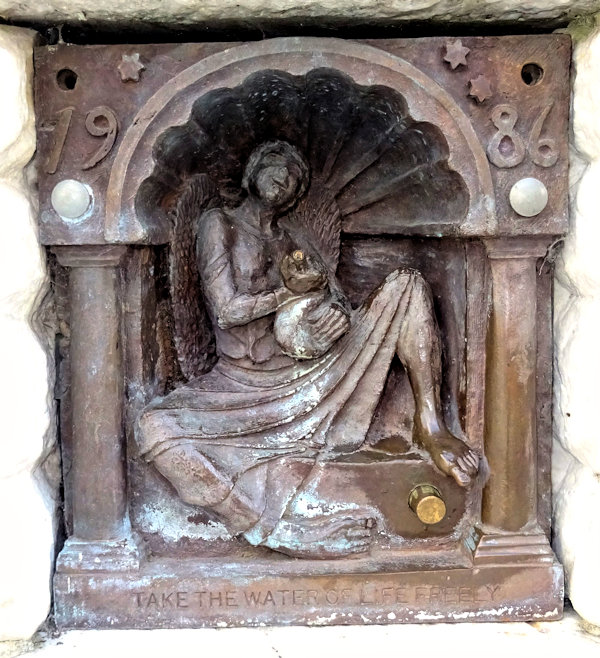
Overview: A basic scan of a cast metal water fountain set into the base of the ‘Rebecca at the well’ statue near the northern side of Bath Abbey, inscribed with the motto ‘Take the water of life freely‘.
Location: North of the Abbey, Bath, western England, United Kingdom [map].
Date/era: Modern, 1986.
Software used: Sony 3DCreator Android app, Nomad Sculpt Andoid app, Meshmixer.
Intended use: 3D printing, preferably in a resin printer at around 50mm or more high.
It has a date of 1986 cast into it at the top, split to 19 and 86 in the two corners, and it appears to be of an angel with a water bottle. At the bottom right is a press-button, which it appears should cause water to flow from the mouth of the bottle held in the angels hands. Also, below it is inscribed the motto ‘Take the water of life freely‘, which appears to be a reference to the biblical verse in Revelations ‘And whosoever will, let him take the water of life freely‘ (see the online King James bible for more information). However, little information seems to be available about it, despite online searching for details.
The scan was made with the Sony 3DCreator app on an Xperia XZ2 smartphone. Despite the small size of the object (around 150mm square), the depth to much of the detail, and the dark colour of the surfaces, 3DCreator did an excellent job of making at least a usable recreation of the original. Obviously it wasn’t able to recreate all the fine details: in particular, the inscribed motto is missing. However, the model still has most of the important details of the original, and for most 3D printing purposes it should do a good job.
The Nomad Sculpt Android app was then used to tidy the scan and trim it to the final shape. Despite being intended as a 3D sculpting application, Nomad Sculpt has proved an excellent tool for processing and tidying up 3D scans, as it has many tools for trimming, sculpting and smoothing, as well as a gizmo tool to help you translate, scale and rotate. It was used on a Samsung Galaxy Tab S6 Lite as it has a pen/stylus that works very well with the pressure sensitivity feature of Nomad Sculpt, allowing simple and sensitive adjustments to be made.
However, the need to remesh to a high polygon count, to allow for fine sculpting, results in a relatively large file size. For that reason, the model was then post-processed using Meshmixer: to make it hollow (to reduce resin use when SLA printing) and to remesh to a sensible file size. The remeshing was done using the solidify tool in Meshmixer, using the sharp edge preserving setting so that not too much detail was lost. You can see the finished model on Sketchfab below (click the play button to load the model and view it in 3D).
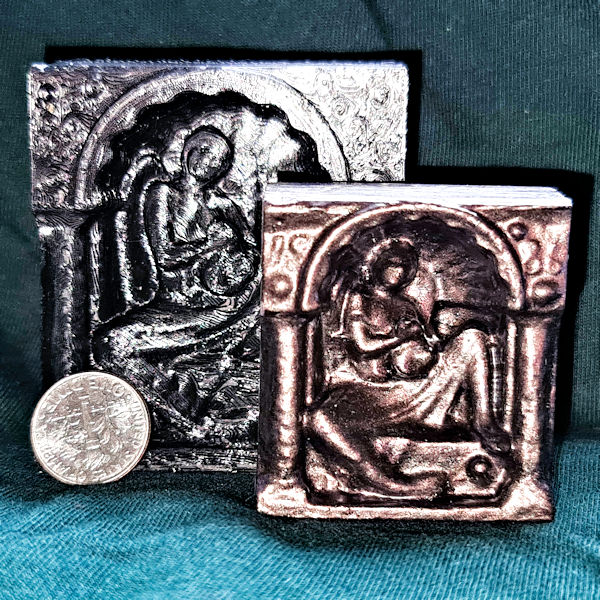
The 3D print on the left of the photo below was made using black Flashforge PLA on one of their Adventurer 3C printers. The one on the right was made using a Monoprice Mini SLA printer with Elegoo water washable resin. Both methods of 3D printing did a good job of recreating the detail in the model, although the need to fused-filament print with the model facing upward (to reduce the need for support material removal) means resin is likely a better option for this model, at least for small prints.
However, if you don’t have a resin printer, fused-filament printing, in PLA or your choice of filament, should still give usable outputs. And of course you could use a high-build primer to reduce layer lines that are hard to reach with files and sandpaper, before painting for a reasonably good result. The resin print was then finished off with Humbrol bronze-effect model paint and a coat of anti-shine varnish, in order to try to approximate the finish and look of the original.
So finally, in case you’d like to use the methods in this project for your own work, let’s recap on what was involved:
- The Sony 3DCreator Android app was used to create a basic 3D scan on a smartphone, which provided a good representation albeit with some softening of sharp details.
- The Nomad Sculpt Android app was used to tidy the 3D scan, including cutting away unwanted material, smoothing poorly scanned areas, and sharpening edges with the crease tool.
- On a PC Meshmixer was used to solidify/remesh the model, to achieve a much smaller file size and to make it hollow at the back to save material when resin printing.
- The finished 3D model was then test printed in resin and PLA, and found to print to an acceptable quality with both material types.
- Due to the amount of detail in the final model, resin printing was found to be the best method of 3D printing it.
Please note that this scan is provided without any license for commercial use. It is intended simply as a model you can have the fun of printing yourself. And of course it is intended to be a motivation for you to visit beautiful Bath and hopefully even view this wonderful object and the adjacent Bath Abbey: click here to see the location in Google Maps.


