
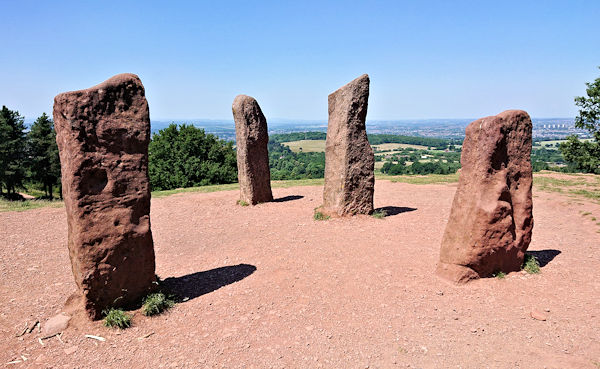
One of the strangest, but most quintessential, aspects of the English countryside are the follies built, for no other reason than that they could, by rich land-owners in days of old. As Wikipedia say, they are ‘constructed primarily for decoration, but suggesting through its appearance some other purpose, or of such extravagant appearance that it transcends the range of usual garden buildings‘. Often they are installed as a building, such as in a classical style, with ornate columns and carvings. But never before have I seen one built as an ancient stone circle, as is the case with the Four Stones that can be found atop Clent Hills in Worcestershire, in the central part of the United Kingdom. Despite looking neolithic, the four stones are actually a folly built in the late 1700s by the lord of nearby Hagley Hall, and offer panoramic views around the local breath-taking scenery. So when I visited there was no way that I could waste the opportunity to make a 3D scan of them, from which to get a representative digital model for 3D printing.
Quick summary of this 3D creation
Overview: A 3D reconstruction of the Four Stones folly atop Clent Hills, incorporating 3D scans of the individual stones.
Location: Clent Hills, central England, United Kingdom [map].
Date/era: 1700s, exact date unknown.
Software used: Sony 3DCreator Android app, Meshmixer, Blender.
Intended use: 3D printing, either in resin or fused filament, the latter being possible without any support material.
The scan was made using the excellent Sony 3D Creator app on an Xperia XZ2 phone, although the large separation between the stones meant a good scan of the whole folly wan’t possible. That meant the final model had to be reconstructed from five scans: a general low-quality scan of the area, plus a more detailed scan of each of the stones. I was pleasantly surprised with the amount of detail the 3DCreator app managed to capture, as the worn stone surfaces didn’t contain a lot of large detail to aid the photogrammetry processes. Meshmixer was used to process the scans and trim away unwanted material. Blender was then used for putting the whole model together using constructive solid geometry modifiers, as well as to trim the base to a sensible shape. You can see the finished model on Sketchfab below (click the play button to load the model and view it in 3D).
The general scan included enough of each stone to allow the individual scans to be located, rotated and scaled fairly accurately. So, although the scan isn’t likely to be dimensionally completely accurate, for 3D printing purposes it should be a pretty good representation. The finished version in the photo below was then printed in PLA using a Monoprice Mini printer, without any support material. Even though, as expected, printing with fused-filament lost a lot of the details, the printer did do a pretty good job of recreating the shape and feel. However, printing in resin, which I tested on a Monoprice Mini SLA printer with standard UV-curing resin, provided a much more detailed scan at around a quarter of the size. So I think your choice of 3D printing method is down to just how much detail you want and the finished size you need. If you want to try 3D printing it yourself, click here to go to the MyMiniFactory page to download it.
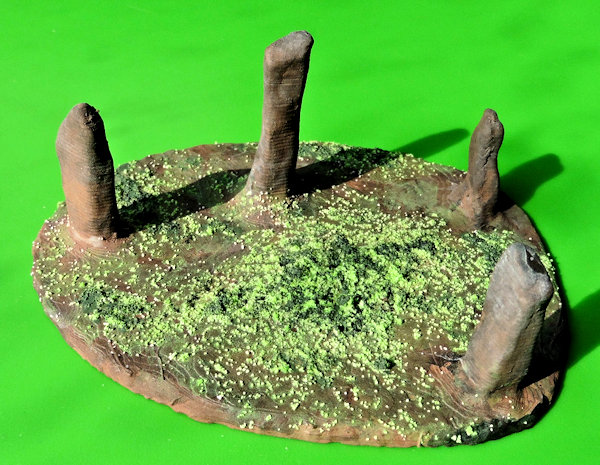
I painted the 3D print using Pebeo craft acrylics and a coat of anti-shine varnish. Given the uniformity of printed resin surfaces, other paints (such as The Army Painter or Citadel ones) would work just as well too, if you do a resin 3D print. However, for fused-filament printing craft acrylics have the advantage of being thicker, so are much better at hiding layer lines. Of course, I could have used a high-build primer for thinner paints, but decided the acrylics would be a better alternative so as to minimise loss of the limited detail.
Obviously there are no hard and fast rules on how you should paint your 3D prints, but it is useful to consider how different methods relate to the method of 3D printing used. I also added some fine sand to the base before printing, sprinkled on a bit of superglue that I spread around. I think it allowed me to add a grass effect that would have been unlikely to work well if I’d added it to the digital model instead. And overall I was very pleased with the results as a simple model of the Clent Hills Four Stones folly I can display in my home to remind me of my visit there.
So finally, in case you’d like to use the methods in this project for your own work, let’s recap on what was involved:
- The Sony 3DCreator Android app was used to create a basic 3D scan, on a smartphone, of each stone.
- A single scan was also made of the whole folly which, although being very low in detail, provided position and scale data for reconstruction.
- On a PC Meshmixer was used to tidy the 3D scans of each stone, including cutting away unwanted material, smoothing poorly scanned areas, and sharpening edges.
- The scans were then imported into Blender, where the general scan was used to rotate, scale and translate the stones into position.
- Blender was also used to combine the elements together, using constructive solid geometry modifiers, and to trim the shape of the base.
- The finished 3D model was then test printed in PLA and resin, and found to print to an acceptable quality with both methods.
- Due to the limited amount of detail in the final model resin printing wasn’t considered necessary, although it worked well for retaining detail in a small test print.
Please note that this scan is provided without any license for commercial use. It is intended simply as a souvenir you can have the fun of printing yourself that advertises this beautiful old folly. And of course it is intended to be a motivation for you to visit Clent Hills yourself and view the spectacular vistas while taking a look at this wonderful old folly: click here to see the location in Google Maps.


