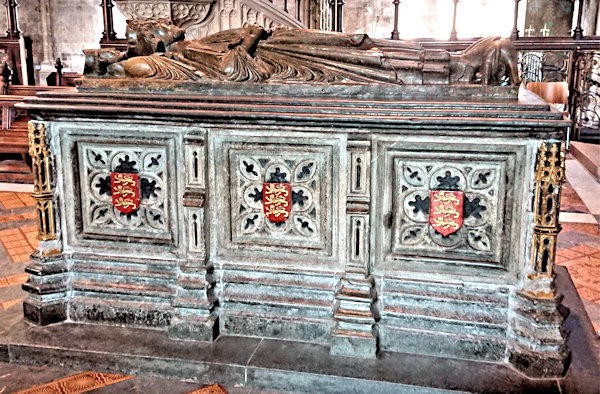
Outside of museums, some of the best historical artefacts in the UK can be found in churches and cathedrals. And, given that the church was a significant power in the running of the country for many centuries, it’s not surprising that many of those artefacts relate to British royalty of old. That’s definitely the case in Worcester, where the cathedral houses the tomb of one of the most famous (or maybe infamous) kings of England: King John. So, this is a quick basic scan of the carved stone effigy atop his tomb in Worcester Cathedral, in western England (click here for a more detailed scan of just the head).
Quick summary of this 3D creation
Overview: A basic scan of the effigy of King John on top of his tomb at Worcester Cathedral.
Location: Worcester Cathedral, Worcester, western England, United Kingdom [map].
Date/era: Medieval, 1232 AD.
Software used: Sony 3DCreator Android app, Meshmixer.
Related posts: Tomb of King John low-poly 3D model, Head of King John.
Intended use: 3D printing, either in resin or fused filament, the latter being possible without any support material.
According to the Worcester Cathedral website the effigy was created in 1232 AD and is considered unusual in being a fairly accurate representation of the king. Apparently the tomb on which it sits is a later addition. And in case you don’t know, King John is mostly notable due to his part in the Magna Carta, described by Wikipedia quite succinctly as ‘a royal charter of rights agreed to by King John of England at Runnymede‘. He was apparently a very religious man and occasionally spent time at Worcester Cathedral, so it isn’t too surprising that his tomb is located here. But you’ll probably agree that he is arguably much more famous for his part in the stories of Robin Hood, although it is likely that his reputation in those stories is largely medieval propaganda.
The scan was made with the Sony 3D Creator app on an Xperia XZ1 Compact smartphone, which did quite a good job given the difficulties smooth stone can cause when 3D scanning. The more intricate details, especially those of the small heads by that of King John, obviously didn’t get into the final scan. However, the amount of detail that was achieved is testament to the quality of the 3DCreator app, which is free and based on photogrammetry, so can’t be expected to give professional quality scans. But, even though there are limits to the quality of 3DCreator scanning, I was very happy with the scan as it was quite good enough for making a small painted model to display in my home.
The scan was then post-processed using Meshmixer to remove extraneous areas and to remesh to a sensible file size, for speed of use in the Sketchfab viewer, as well as to allow speedy downloads. The solidify tool was used for that, with the sharp edge preserving setting allowing a sensible file size with minimal loss of the limited detail contained in the original scan. Meshmixer has a wide range of available tools that are very useful for processing 3D scans, including 3D sculpting brushes that are as good as those in many commercial sculpting packages. You can see the finished model on Sketchfab below (click the play button to load the model and view it in 3D).
The finished model in the photo below was printed in PLA using an XYZPrinting DaVinci Jr printer. It did a good job of printing the model, although it did lose some of the limited detail in the digital STL file. So I think it would be much better to print it in resin, if you have a resin printer, if you want the best quality result. However, the good news is that the model doesn’t have any sharp overhangs to complicate the 3D printing, so it was possible to fused-filament print it without any support material. If you want to try 3D printing it yourself, click here to go to the MyMiniFactory page to download it.
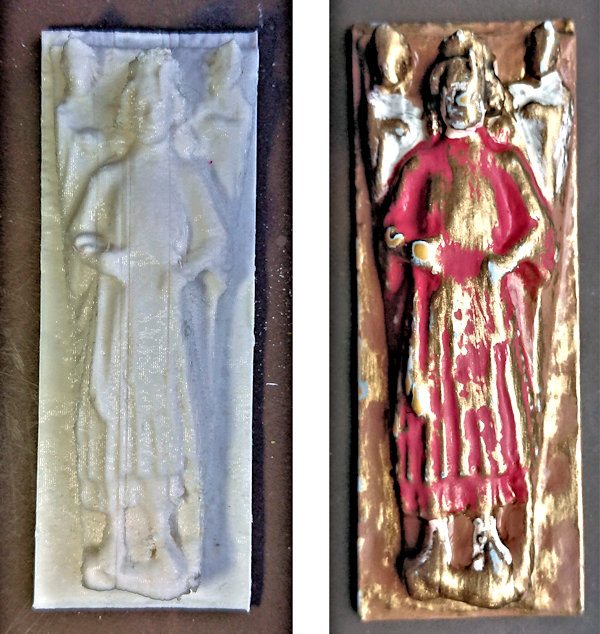
The 3D printed model was then painted using Pebeo craft acrylics. I didn’t want to simply paint it to reflect the stone surface of the original, but rather I wanted a more regal look. So, I first painted it in gold-effect acrylic, as I felt befits a tomb of royalty. When that was dry I then painted the white and red areas over it and left them to dry well too. Then, when the paint was fully hardened, I used a rough scourer to gently remove some of the top coats and expose some of the gold paint beneath. That gave a worn look that I decided would give the feel I wanted: basically looking regal but also very old. The print was then coated with some Pebeo craft clear-coat varnish, which helped reduce the glossiness, especially of the gold paint. It ended up with a simplistic look, but displayed on a wall, at a small size, I think that worked out well for me.
So finally, in case you’d like to use the methods in this project for your own work, let’s recap on what was involved:
- The Sony 3DCreator Android app was used to create a basic 3D scan on a smartphone, which provided a good representation, albeit with some loss of detail.
- On a PC Meshmixer was used to tidy the 3D scan, including cutting away unwanted material, smoothing poorly scanned areas, and sharpening edges.
- Meshmixer was also used to solidify/remesh the model, to achieve a much smaller file size, using the sharp edge preserving setting so as not to lose what fine detail was available in the original scan.
- The finished 3D model was then test printed in PLA and found to print to an acceptable quality.
- Due to the limited amount of detail in the final model, resin printing wasn’t considered necessary, although it should work well, especially for small prints, and would have allowed more of the limited detail in the original to come through.
Please note that this scan is provided without any license for commercial use. It is intended simply as a historical model you can have the fun of printing yourself that advertises this wonderful old tomb and Worcester Cathedral. And of course it is intended to be a motivation for you to visit Worcester Cathedral yourself to soak up the atmosphere and view the tomb of King John: click here to see the location in Google Maps

