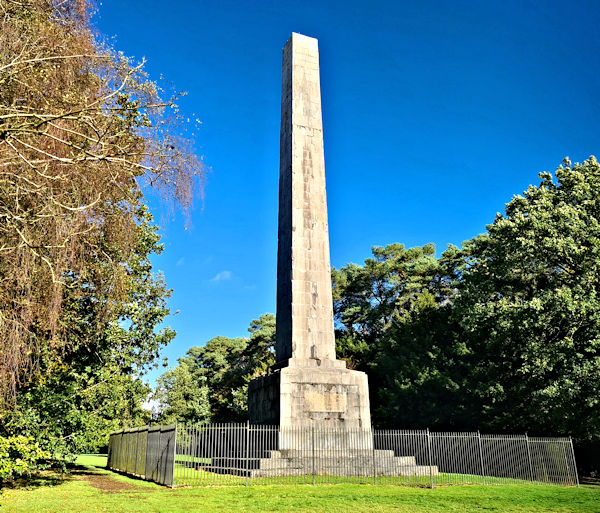
It often surprises me that so many wonderful old monuments are tucked away, only visible to those in the know. That’s definitely the case with the sixth Earl of Plymouth monument (sometimes just called Lickey Monument), off Monument Lane in the village of Lickey, south of Birmingham in the UK. According to the Lickey Community Group the monument, an obelisk, was built in 1834, placing it during the reign of King William IV, and is made of Anglesey marble. They also say that it is Grade II Listed and was restored, cleaned and re-dedicated in 1995. When built it was visible from miles around, and according to Wikipedia, even as far as Bromsgrove. However, the trees have grown quite tall around it now, so most people in the know will only have seen it when walking around this area of Lickey Hills Country Park. So, having visited the monument, I decided it would make excellent inspiration for a 3D design and print project, so everyone can get a feel for what it looks like.
Quick summary of this 3D creation
Overview: A 3D design based on the 6th Earl of Plymouth monument on Monument Lane in Lickey.
Location: Lickey, central England, United Kingdom [map].
Date/era: William IV reign, 1834.
Software used: OpenSCAD.
Intended use: 3D printing with fused filament printers, without support material, although it will print well in resin too.
An inscription on one side of the monument states ‘Erected by the Worcestershire Regiment of Yeomanry Cavalry to mark their lasting gratitude to the honoured memory of their beloved and lamented Colonel Commandant and by the county at large to commemorate the disinterested, solid and efficient public services and to commend to imitation the exemplary private virtues of Other Archer Sixth Earl of Plymouth.‘ The name ‘Other’ may seem a little odd, especially in our modern age. However, Wikipedia tells us that it is ‘traditional in the family and derives from a legendary Viking ancestor Otho or Othere‘.
It’s not possible to access the monument itself, as it’s fenced off. The model was therefore made using OpenSCAD based on dimensions taken from a photograph. The photograph was taken with the camera held vertically and the field of view angles for the camera (determined using OpenCV in Python code) were used to correct the dimensions to ensure the model is as representative of the actual shape as possible. If that doesn’t make complete sense, try thinking about the fact that the pixels in a digital photo are actually recording angles, so if we remove distortion from them we can try to calculate the height and width.
So while not completely accurate it should be quite a good representation of the monument for most purposes. And if you’re interested in how OpenSCAD was used to create the model from the dimensions, the complete code is below. It’s actually very short and most of it is arrays of the dimensions. The function at the top creates the model from two parts: the first being the shape of the obelisk itself. The second, the ‘insetblocks’ part, creates a cutout that forms the inset areas on the base, including where the inscription is located. So, the difference() operator just makes the obelisk and removes material where the insets are. So, if you want to try something similar from your own dimensions, it should be relatively easy to adapt this code.
difference()
{
  monument();
  insetblocks();
}

module monument()
{
  rotate([0,0,45])
    rotate_extrude($fn = 4)
      polygon(points=[[0.0,100.0],[4.088234683955295,97.02424338281938],[6.718641204881317,22.058901622044697],[8.724841894373851,21.446229590789972],[8.76666131818212,20.285321124201666],[11.948346718589148,19.54353439695077],[12.36755147635891,19.059697852432237],[13.12249219043651,19.059697852432237],[13.50014935082145,8.347701929527242],[14.045883396536691,8.119980891804559],[14.129867121090363,5.153042531608526],[17.958819376704078,5.153042531608526],[17.958819376704078,3.7136335618703122],[22.695934857170194,3.7136335618703122],[22.695934857170194,2.073615715811433],[27.50963268513983,2.073615715811433],[27.50963268513983,0.0],[0.0,0.0]]);
}

module insetblocks()
{
  for(c=[0:4])
    rotate([0,0,c*90])
      translate([9.547488932688438,0,13.953231482389931])
        polyhedron (points=[[-0.5967180582930274,-6.994113124386261,-2.735066184992098],[-0.5967180582930274,6.994113124386261,-2.735066184992098],[-0.5967180582930274,6.994113124386261,2.735066184992098],[-0.5967180582930274,-6.994113124386261,2.735066184992098],[0.5967180582930274,-8.187549240972317,-3.9285023015781526],[0.5967180582930274,8.187549240972317,-3.9285023015781526],[0.5967180582930274,8.187549240972317,3.9285023015781526],[0.5967180582930274,-8.187549240972317,3.9285023015781526]],faces=[[0,1,2,3],[7,6,5,4],[3,2,6,7],[1,5,6,2],[3,7,4,0],[4,5,1,0]]);
}
As the model is completely created through constructive solid geometry in OpenSCAD, there really is no need for any post-processing at all: basically it’s ready to go straight from OpenSCAD to your 3D printer. And, because it’s made from a small number of dimensions, and there are only four sides, the finished 3D model STL file is only around 34 kilobytes in size: pretty nifty for a model that looks quite good on a shelf! You can see the finished model on Sketchfab below (click the play button to load the model and view it in 3D).
The finished, and painted, version in the photo below was printed in PLA using a Monoprice Mini printer. It did a very good job of representing the digital version, which you’d expect given that there aren’t any complex curves and shapes to reproduce. However, you should be able to easily print it with fused filament or resin printers, and it should need no support material if printed upright. If you want to try 3D printing it yourself, click here to go to the MyMiniFactory page to download it.
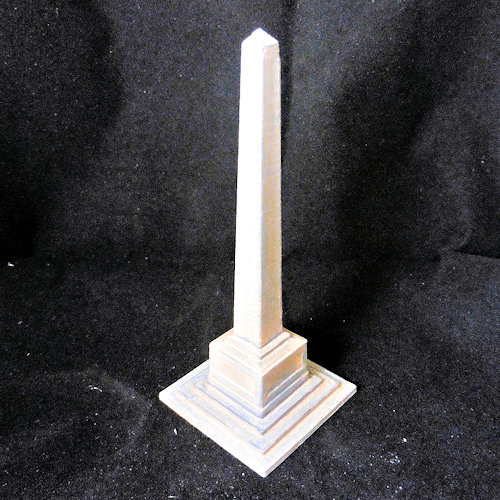
The 3D model was then painted with Pebeo craft acrylics, using a light brown base coat followed by washes at increasing dilution. That was intended to try to create a stone effect, which I think worked quite well. The acrylic paints were obviously a little thicker than other model paints, which helped hide layer lines and so prevent the need for a resin coating or high build primer. Also, I often worry that craft acrylics will also hide some of the detail. But, for this model, there is very little detail to worry about so choice of paint type is made much easier. After painting, it was then given a coat of matt varnish to control shininess and provide a look more reminiscent of weathered stone.
So finally, in case you’d like to use the methods in this project for your own work, let’s recap on what was involved:
- The dimensions of the obelisk were measured from a corrected photograph, at heights where the width changed, to provide data for a half cross-section.
- OpenSCAD was then used to rotationally extrude the cross-section to form a solid shape (i.e. it is a solid of revolution).
- The finished 3D model was then test printed in PLA, and found to print to an acceptable quality.
- Due to their being little fine detail, resin printing wasn’t considered necessary, although it should work just as well and would be useful for very small prints.
Please note that this model is provided without any license for commercial use. It is intended simply as a historical model you can have the fun of printing yourself that advertises this beautiful old monument. And of course it is intended to be a motivation for you to visit Lickey Hills yourself, and stop on your walk through Lickey to view this wonderful old monument to the 6th Earl of Plymouth: click here to see the location in Google Maps.


