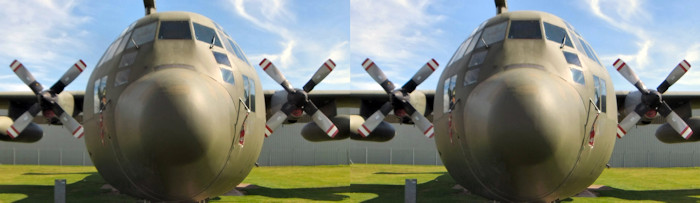
Recently I was doing some work on my simple 3D photos code library for Python 3. It seemed a good time to go the whole hog and put all the library code on Github with some examples, to make it easier for anyone to use. So I did, and you can find and download it on Github by clicking here. And what better way to celebrate that than through some example coding. And one of the things I find very useful with 3D photos is to be able to rotate the two views, which you can’t do easily in a ‘normal’ 2D photo editor. So to begin, I used the 3D photo below, of an aeroplane at the excellent RAF Cosford museum.
I’ll assume you’ve downloaded the whole repo from Github and are coding in the root of that folder. In which case we need to import some things first. We import os just for making a path to our file, which is very handy as it helps the code work on different operating systems. We’ll use the PIL (Python Pillow) ImageDraw for drawing some lines over images. And we’ll use pyplot for displaying our results. More importantly though, we import the image and sbs modules: they are from the Photos3D library folder and allow us to do basic image manipulation and use side-by-side 3D photos.
import os
from PIL import ImageDraw
from matplotlib import pyplot as plt
from photos3d import image as img
from photos3d import sbs as sbsimg
Now we can open our 3D image of the aeroplane using the sbs module load function. The 800 value as the second parameter is used to tell it to resize the image to 800 pixels wide. That’s just to make this example run quicker and can usually be left out. The dosplit parameter tells it to split the loaded side-by-side image into seperate left and right views (which is mostly what we need for using the library). The rang variable is the rotation angle, in degrees, we want to use with the left and right images: note that you need a negative angle with PIL to get clockwise rotation.
fname = os.path.join("testimages", "cosfordplane.jpg")
rang = -5 # Angle of rotation in degrees (in PIL negative is clockwise)

leftim, rightim = sbsimg.load(fname, 800, dosplit=True)
imw, imh = img.size(leftim)
Having done that we can now have a go at rotating the stereo views using the code below. We can do that seperately for left and right view images if we want, but Photos3D lets us do both at the same time. Also, we’re creating two versions of the rotated image: one cropped and the other not. The uncropped version is just so we can display the area that we crop out. The cropped one will demonstrate automagically using the library to calculate the largest area rectangle in the rotated image and crop down to it.
left_rotim, right_rotim = img.rotate(rang, leftim, rightim, docrop=False)
left_rotcropim, right_rotcropim = img.rotate(rang, leftim, rightim, docrop=True)
We can now use the size of our original image, together with the rotation angle, to call get_rotated_crop_size in the Photos3D image module. It calculates the width and height the image should be cropped to in order to keep the largest area of rectangle (click here if you want to read how to work it out on Stack Overflow). And then we can use that information to draw a box on the uncropped-rotated image so you can see what was lost during cropping.
cropw, croph = img.get_rotated_crop_size(imw, imh, rang)
rotimw, rotimh = img.size(left_rotim)
top = (rotimh / 2) - (croph / 2)
bot = (rotimh / 2) + (croph / 2)
lft = (rotimw / 2) - (cropw / 2)
rgt = (rotimw / 2) + (cropw / 2)

left_draw = ImageDraw.Draw(left_rotim)
left_draw.line((lft, top, rgt, top), width=3, fill='red')
left_draw.line((lft, bot, rgt, bot), width=3, fill='red')
left_draw.line((lft, top, lft, bot), width=3, fill='red')
left_draw.line((rgt, top, rgt, bot), width=3, fill='red')
right_draw = ImageDraw.Draw(right_rotim)
right_draw.line((lft, top, rgt, top), width=3, fill='red')
right_draw.line((lft, bot, rgt, bot), width=3, fill='red')
right_draw.line((lft, top, lft, bot), width=3, fill='red')
right_draw.line((rgt, top, rgt, bot), width=3, fill='red')
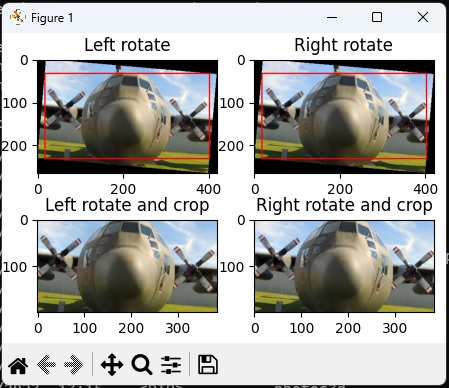
And now we can display our images using Matplotlib. We’ll use some subplots to make a 2×2 grid with left and right versions of both images.
fig=plt.figure()
fig.add_subplot(2,2,1)
plt.imshow(left_rotim)
plt.title("Left rotate", fontsize=12)
fig.add_subplot(2,2,2)
plt.imshow(right_rotim)
plt.title("Right rotate", fontsize=12)
fig.add_subplot(2,2,3)
plt.imshow(left_rotcropim)
plt.title("Left rotate and crop", fontsize=12)
fig.add_subplot(2,2,4)
plt.imshow(right_rotcropim)
plt.title("Right rotate and crop", fontsize=12)
fig.tight_layout()
plt.show()
The results are below. As you can see, cropping the rotated image to the largest area rectangle removes unwanted background triangles but still keeps as much of the image as possible.
Well, that’s all there is to rotating and cropping stereo pairs with the Photos3D library in Python 3. I hope you find it, and the other examples in the repo, useful 🙂


