
Not everyone who wants to use Blender will have the money or inclination to buy a high-powered computer with a high-end GPU. Obviously if you’re heavily into designing and rendering very complex 3D scenes into video it could make sense, but I for one only do high-quality rendering occasionally. So while recently playing with some Blender rendering I wondered just how quickly I can expect single frames to render with only an integrated graphics card: and by that I mean CPU-based rendering.
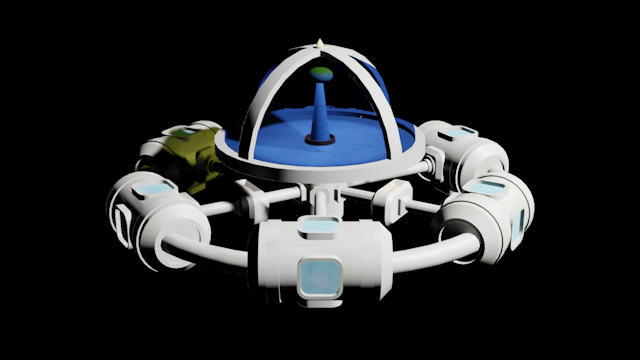
So to start with I used a simple model of a space station I’ve been working on for a bit of fun, which has 11039 vertices and 22110 triangles, plus a number of Krita-painted UV-unwrapped texture images. Obviously that’s not a highly complex scene, but for many hobby uses it’s quite a reasonable complexity to consider, and it’s shaded smooth which adds to the render complexity. To get a sense of baseline rendering times I first rendered it in HD (1280×720 pixels) using the Eevee engine, without all the hassle of things like reflections and complex ray-tracing. The result is shown below, which took just a couple of seconds to completely render.
Obviously that’s very impressive performance by the Eevee engine. And for many uses the results are perfectly acceptable: so for non-photo-realistic rendering, at say 30 frames-per-second, I could render a minute of animation in an hour. But sometimes we want something more realistic, such as renders with reflections on shiny surfaces. And for rendering from the commandline (like on a headless mini-render-farm) using Eevee is currently very difficult if not impossible. In which case our only real choice becomes to use the Cycles render-engine. So next I made the same render, but using Cycles, which you can see below.
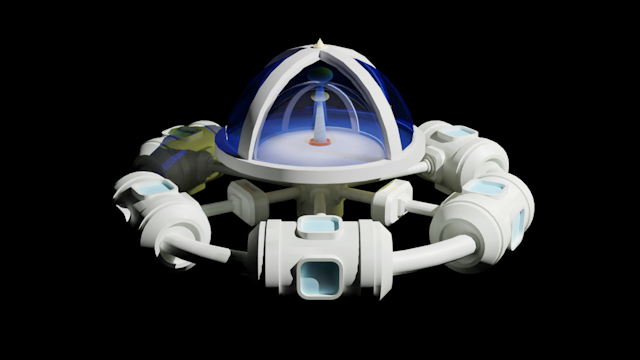
I think it’s pretty obvious that the Cycles render is much more impressive than my Eevee attempt. I say that because the directional light I put inside the dome is now having a proper effect, and there’s reflection and refraction in the glass of the dome (rendered with transparency and glass shaders). And if you look closely at the modules around the ring you can see clearly that the shadows are much more realistic. But, how much difference did it make to the rendering time? Well, to answer that I tried four different computer configurations, all being mid-range devices suitable for hobby 3D editing, and all with Core i5 processors, integrated graphics and 8GB or RAM. I’ve put a graph of the render times below.
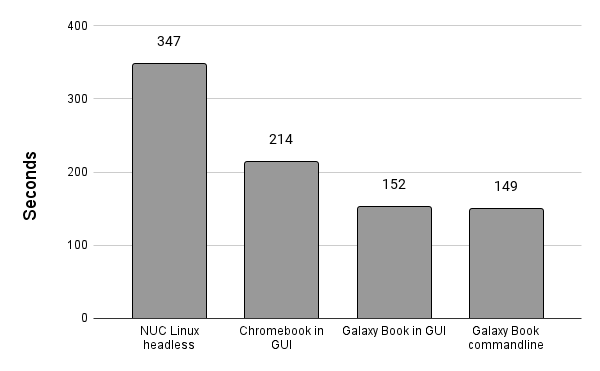
The first was my old Intel NUC running Ubuntu linux headless, with the rendering done through a Python script. It was quite slow, but then it only has a dual-core 7th generation i5 processor. However, I won’t let that put me off using it as a simple render farm (or maybe more of a render allotment) as I can just leave it rendering in the background. The Chromebook was much quicker, having a 10th generation i5, but not as quick as the 11th generation Samsung Galaxy Book under Windows 11, which was around twice as fast as the NUC. I found that a little surprising as the Chromebook supposedly runs a less demanding operating system than Windows. I also tried using the Python script from the commandline with Windows 11 and it made very little difference compared to rendering in the Blender GUI.
Having done that I wondered how much difference I could expect from using different resolutions. HD (1280×720) is quite a good size for most of my uses, but I decided to give QVGA (320×240), VGA (640×480) and full-HD (1920×1080) a try. I’ve put a graph of those results below and the main outcome is that the rendering time is directly proportional to the number of pixels (i.e. the graph is a straight line). That’s not really unexpected as Cycles has to ray trace for each pixel, but nevertheless it’s nice to know for sure. So, basically, doubling the number of pixels doubles the rendering time too.
Now, one of the reasons Cycles took about 150 times as long as Eevee to do the render is simply the detail it creates from ray-tracing. And things like reflection and refraction are computationally expensive. So I decided to look at the effect the mixed transparency and glass shaders had on the render times. To do that I rendered at 1280×720 for the four options in the image below.
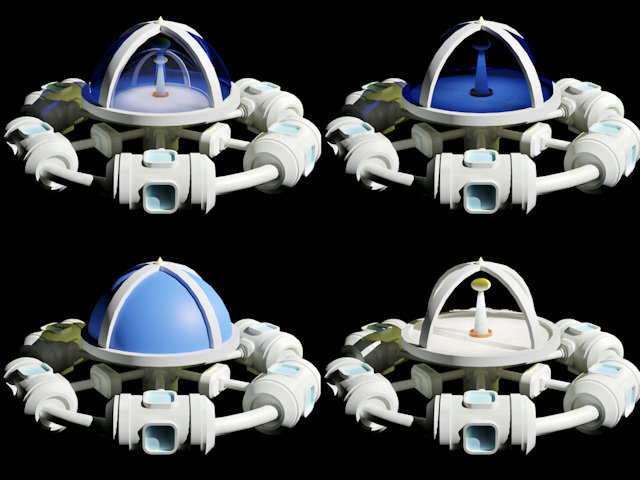
The first was the previous HD render, the second being to remove the glass shader and just use the transparency shader on its own. The other two were just using a flat opaque image texture and not having the glass dome at all. All were done to the same HD image resolutions and the results are below. The interesting thing is that not using a glass shader reduced the render time by around 8%. Although that’s quite significant it’s probably not anywhere near enough difference to make me want to avoid using it: the resulting render lacked the reflections the glass shader caused which, of course, is one of the main reasons I considered the Cycles render better than the Eevee one.
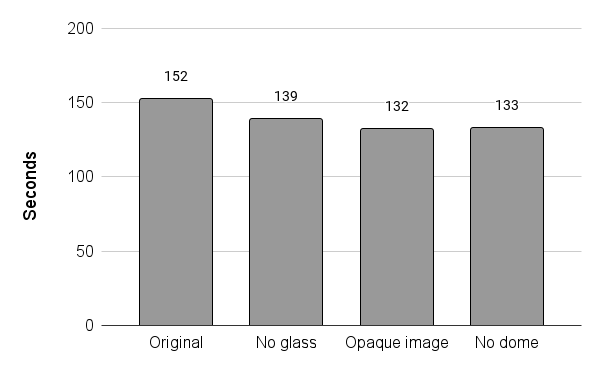
But the interesting thing was that using an opaque image texture made very little extra difference, even though the inside of the dome didn’t need to be drawn. Of course, it was still there so could have affected Cycles calculations, but I would have expected less ray intersections with those geometries, so some reduction in time. And another interesting outcome was that not drawing the dome glass at all only shaved a few seconds off the no-glass-shader render. So overall it seems the transparent shader wasn’t overly expensive in terms of render time.
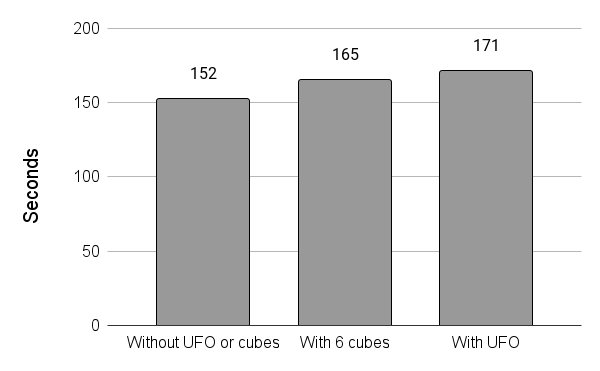
Obviously the renders had limited amounts of reflection, so I also tried adding some extra geometry to increase that. To do that I used the options in the image below. The first was the same HD render used thus far. The second simply involved adding six red cubes, increasing the vertex count by only 48. The third was addition of a UFO model with an image texture, which added 2944 vertices to the original scene.

The render times for each of those options are shown in the graph below. Interestingly, the six cubes’ limited complexity and flat shading added over 8% to the original render time. The much more complex UFO, with a 2048×2048 pixel image texture to cope with, increased it by almost 13%. Both are significant increases and show that adding even small amounts of extra ray-intersection calculations adds a lot of extra overhead to Cycles’ calculations. But it also shows that model complexity isn’t the be-all and end-all of impacts on render time, compared to things like size and position. And, of course, the extra fun of adding a UFO to my scene was well worth a little extra render time.
So what did I learn from this? Well, mostly it was that using Eevee is enormously quicker than Cycles, and certainly is the best option for test renders before making the finished product. But for single images I’m happy to wait a few minutes if I want something resembling a photo-realistic output. However, for producing video I think the results highlight that photorealistic rendering with Cycles, at high resolutions, really requires a proper GPU. After all, even for my quite simple space station in HD it would take me around an hour and a quarter to render a single second of video, or even two and a half hours headless on my old NUC! But the most important thing is that now I have a better idea of what I can achieve on my mid-range computers when I Blender-render 🙂


