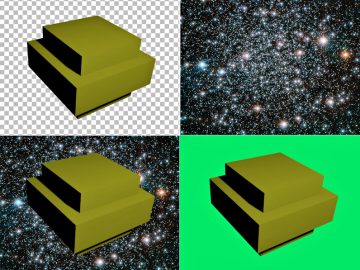
P5.js is a Javascript-based web-framework that allows you to write code to run in web-pages in a similar style to Processing. And the really exciting thing is that it even allows you to create a 3D canvas and draw your 3D models, such as ones you make in Blender, for everyone to see on your website. So I thought I’d write a post about how to do just that, using a simple 3D UFO I made in Blender and texture-painted in Krita. You can see it running in a ReplIt REPL below: after clicking the run icon just click your mouse over it (or tap on a touchscreen) and the UFO will jump away. And after you’ve tried it out read on to learn how it works.
I’ll go over the code below for anyone familar with a bit of Processing coding, but if you want to dive straight in, or want to look at the whole code while following along, you can download all the files at the Parth3D Github repo or even fork the repl.it page where it was created. It includes a copy of P5.min.js current at the time I wrote the code, but if you download the code please update it from their website. On Github and Repl.it you’ll also find the 3D model of the UFO and texture images (the space image being courtesy of the nice NASA people), but with a bit of playing with the code you should easily be able to use your own if you wish. And on the repo/repl you’ll also find the html and css files that go with the code.
So, to start looking at the code! It’s in the file named ‘ufo.js‘ and you’ll probably notice that it looks a lot like Processing code. Strictly speaking it’s Javascript, and you can actually use Javascript code in the file, but for now we’ll not worry about that. At the start you’ll see that we are creating some global variables. The ‘ufo‘ variable will hold our 3D model, the ‘ufotex‘ one will hold the texture image for the UFO, and ‘spacepic‘ will hold an image of space to go in the background. The rest of the variables should be self-explanatory and control things like position and rotation, plus whether the UFO is ‘bouncing’.
let can, gscl=1, ufo, ufotex, spacepic;
let ufox=0, ufoy=0, ufoz=0;
let uforotx=0, uforoty=0, uforotz=0, spacerotz=0;
let bouncing = false;
let bvexx, bvecy, bvecz, bang, bdist, bwobble=0;
Now you may wonder why next we have a function names preload, although you may have guessed from the name. Well, it’s run when the page loads, before anything else, and allows us to let the web-browser retrieve files before we start doing anything with them. With straightforward Processing code we don’t normally need to do any preloading because the files are already on the computer with the code. But, for a web-app, it can take a bit of time for the web-browser to get them ready to use. And we’re using it to get our OBJ and image files before we start using them.
function preload()
{
  ufo = loadModel('./data/simpleufo.obj');
  ufotex = loadImage('./data/simpleufotexture.png');
  spacepic = loadImage('./data/space.jpg');
}
Next up we have our setup function just like in Processing. It will run as soon as preload is done, so we can ignore the delay in loading files from the web. You’ll notice we’re using frameRate to make our animation run at 30 frames-per-second, so it should run the same speed regardless of the machine we run it on. But, the main difference you may notice from Processing is that we’re not using a size command to set the sketch dimensions. Instead we use createCanvas, and instead of something like P3D for the rendering mode, we use WEBGL as that’s what browsers use for 3D. It actually creates a HTML5 canvas element in the web-page so it has somewhere to draw. The setup function also reduces the size of the canvas, if needs be, to cope with running on smartphones.
function setup()
{
  var csz = 600;
  if(windowWidth < 600 || windowHeight < 600)
  {
    csz = windowWidth;
    if(windowHeight < csz) csz = windowHeight;
    gscl = csz / 600;
  }
  can = createCanvas(csz, csz, WEBGL);
  frameRate(30);
}
To help with the flow, I’ll jump ahead to the object drawing functions. We have two of them, one for the UFO and one for NASA’s lovely background space image. The interesting thing about these two functions is just how similar they are to Processing, which is one of the main advantages of using P5.js. Basically, we’re just applying translations, scales and rotations to the drawing of 3D shapes. For the UFO one I should mention that when the OBJ was loaded in preload, it also got the UV coordinates for the texture image, as they were written by Blender when the OBJ was exported. And for the space one, we’re simply creating a plane from four 3D points, onto which the texture image is drawn.
function drawufo()
{
  push();
  translate(ufox, ufoy, ufoz - 20);
  scale(300);
  rotateX(-cos(uforotx) * (PI * 0.1) - (PI * 0.075));
  rotateY(uforoty);
  scale(-1, 1, 1);
  rotateZ(-cos(uforotz) * (PI * 0.3) * bwobble);
  rotateZ(PI);
  noStroke();
  texture(ufotex);
  model(ufo);
  pop();
}

function drawspace()
{
  var wid=1041, hgt=987;
  push();
  translate(0, 0, -10000);
  rotateZ(-spacerotz);
  scale(30);
  texture(spacepic);
  beginShape();
  textureMode(NORMAL);
  noStroke();
  vertex(-wid/2, -hgt/2, 0, 0, 0);
  vertex(wid/2, -hgt/2, 0, 1, 0);
  vertex(wid/2, hgt/2, 0, 1, 1);
  vertex(-wid/2, hgt/2, 0, 0, 1);
  endShape();
  pop();
}
Armed with those two functions, we can now look at the draw function: again it’s a standard Processing function, and in this case it’s automatically called every frame (in this case 30 times per second, because we used frameRate(30) in setup). We use it first to create some lights. The ambient one is mainly there to fill in shadows and light the space background. The directional one lets us add some variation in lightness around the UFO, which will also accentuate the 3D effect during rotations as the shadowy areas will seem to move. We then simply call our UFO and space drawing functions to render them to the canvas, after which we adjust our global variables ready for the next automatic call to draw. The bwobble part is there to add a Z rotation to the UFO when we bounce, which settles to zero over time and adds a subtle bit of extra realism to the animation.
function draw()
{
  if(bouncing) updatebounce();
  background(200);
  ambientLight(100, 100, 100);
  directionalLight(255, 255, 255, -0.5, 0.5, -1);
  perspective(PI/2, float(width)/float(height), 0.1, 20000);
  scale(gscl);
  drawspace();
  drawufo();
  spacerotz += PI/2000;
  if(spacerotz>2*PI) spacerotz-=2*PI;
  uforotx += PI/80;
  if(uforotx>2*PI) uforotx-=2*PI;
  uforoty += PI/100;
  if(uforoty>2*PI) uforoty-=2*PI;
  if(bwobble > 0.01)
  {
    bwobble *= 0.98;
    uforotz += PI/100;
    if(uforotz>2*PI) uforotz-=2*PI;
  }
  else
  {
    bwobble = 0;
    uforotz = 0;
  }
}
You may have noticed that we call a function called updatebounce in the draw code above. That we simply use to calculate new positions for the UFO, which you noticed previously were used in the drawufo function. The variables bdist and bspeed are set randomly at the start of bouncing, as is the vector (bvecx, bvecy, bvecz) which controls the direction of the bounce based on the mouse/tap location (more on that soon). The variable bang holds an angle between 0 (at the start of bouncing) and PI (at the end), which is used in a sin calculation to get the UFO offsets by scaling bdist along our bounce vector. That’s so the UFO will move a little slower at the farthest distances, making the bounce look more natural. And when bang gets to PI we stop bouncing and zero the UFO offsets.
function updatebounce()
{
  if(bang > PI)
  {
    bouncing = false;
    ufox = 0;
    ufoy = 0;
    ufoz = 0;
  }
  else
  {
    bmag = sin(bang) * bdist;
    ufox = -bvecx * sin(bang) * bdist;
    ufoy = -bvecy * sin(bang) * bdist;
    ufoz = -bvecz * sin(bang) * bdist;
    bang += bspeed;
  }
}
After that you probably want to know what starts the bouncing. Well, it’s done in another of our familar Processing finctions, mousePressed. Fortunately, mousePressed also works with touch events, so the code works fine in mobile browsers. The code first checks to make sure the mouse/touch event happened inside the canvas, using P5.js’s mouseX and mouseY calls. It then maps the mouse positions to the variables bvecx and bvecy as values between -1 and 1 (0 obviously then in the very middle). Together with bvecz set to 1 (to point straight into the canvas) we get our UFO bounce vector: which we normalize to a magnitude of 1 just to make the calculations in updatebounce give correct distances. Finally we randomly set our bounce parameters, then return false which tells the browser not to do its’ default mouse-pressed things.
function mousePressed()
{
  var mag;
  if(mouseX>=0 && mouseX<width && mouseY>=0 && mouseY<height)
  {
    if(!bouncing)
    {
      // Make a vector for the bounce
      bvecx = map(mouseX, 0, width, -1, 1);
      bvecy = map(mouseY, 0, height, -1, 1);
      bvecz = 1;
      // Normalize the bounce vector (i.e. mag=0)
      mag = sqrt(bvecx * bvecx + bvecx * bvecz + bvecz * bvecz);
      bvecx /= mag;
      bvecy /= mag;
      bvecz /= mag;
      // Make a random bounce distance and speed
      bdist = (random() * 9000) + 300;
      bspeed = (random() * (PI / 20)) + PI/50;
      // Set start of bounce
      bang = 0;
      bwobble = (random() * 0.5) + 0.5;
      bouncing = true;
    }
  }
  return false;
}
And that’s all there is to the code. That’s the power of using a Processing-style language for web coding: it makes things like animating interactive 3D scenes really quite simple. And hopefully you’ve got some ideas on how to use the code for your own web-based visualisations and animations 🙂


