
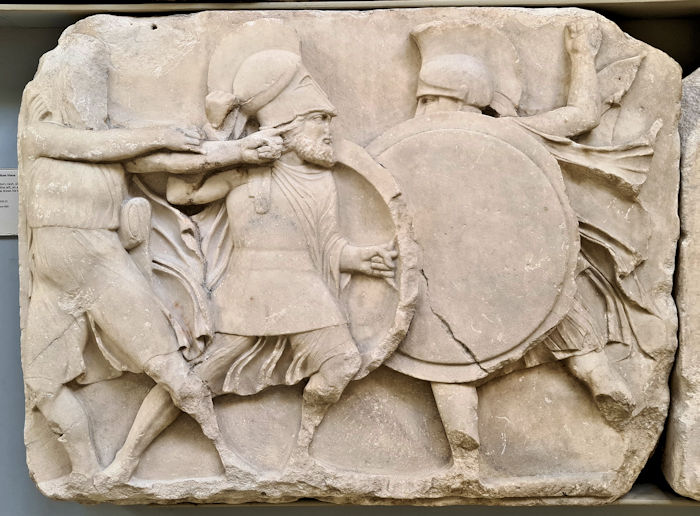
The Nereid Monument is an ancient tomb from what is now south-west Turkey. According to Wikipedia it fell into ruins until the 1840s when a traveller called Charles Fellows rediscovered it. While not actually being a Greek temple it was apparently built to resemble one of the Ionic order. And if you want to see it, which you should definitely enjoy, you’ll find much of it erected inside the British Museum in London. It’s an amazing ancient tomb and fortunately some of the carved friezes from it are displayed near floor level, making it possible for me to create this 3D scan of one for my collection of history-related 3D prints.
Quick summary of this 3D creation
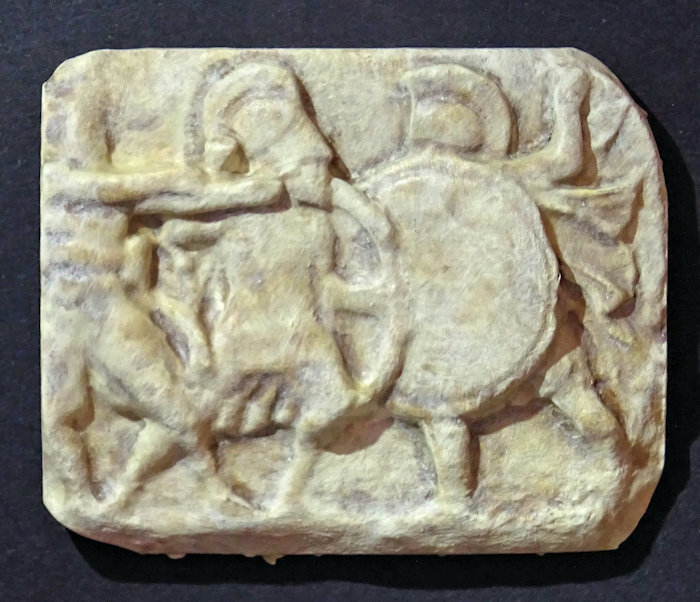
Overview: A basic scan of a Large/Greater Podium Frieze from the Nereid Monument.
Location: British Museum, London [map].
Date/era: Ancient, circa 4th century BC.
Reference: GR 1848.1020.35 (BM Sculpture 859).
Software used: Sony 3DCreator Android app, Nomad Sculpt Andoid app, Meshmixer, Meshlab, Blender.
Intended use: 3D printing of a miniature model, preferably in resin.
Download: MyMiniFactory page.
The British Museum information board describes the scene as ‘Two warriors clash, shield-on-shield, while, to the left, an archer leans back as he draws his bow‘. And according to their website ‘The monument was probably built for Erbinna (known as Arbinas in Greek), ruler of Lycian Xanthos in modern-day south-west Turkey. Although he wasn’t Greek, Erbinna chose to be buried in a tomb that mostly resembled a Greek temple of the Ionic order, but here placed on a high podium following the local tradition for burials of important individuals‘.
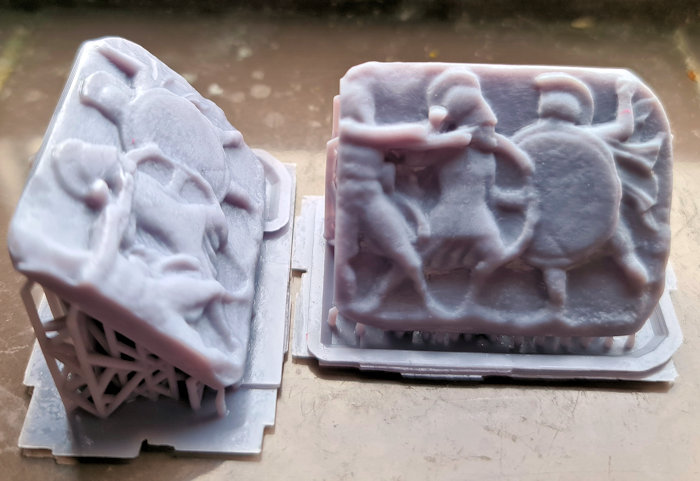
The scan was made with the Sony 3DCreator app on an Xperia XZ2 smartphone. Even though Sony seem to have abandoned 3D Creator, it’s still arguably the best smartphone method for guerilla-style 3D scanning, taking little time to create a very usable textured mesh. And for this project it did a very good job, needing very little editing. Blender and Meshlab were then used to create a colour-by-vertex GLTF file for loading into Nomad Sculpt on an Android tablet.
Nomad was used to tidy up some minor defects in the scan, and trim off excess ‘material’ around the edges. The resulting file was then re-meshed in Meshmixer (using the sharp edge preserving mode) and scaled to a sensible size: I chose 50mm high as it’s a good size for displaying, but there’s enough detail to create a much bigger version. You can see the result of all that work on Sketchfab below (click the play button to load the model and view it in 3D).
I decided to print the edited model in my Anycubic Photon Mono SE SLA printer using Elegoo water-washable UV-cured resin, as I wanted a miniature that retained plenty of detail. As the volume was quite small, and so wouldn’t use much resin, I decided not to hollow the model. However, I did print it at an angle, to eliminate the need to remove support material that could have spoiled the finish. You can see the results of the printing (at 50mm high) in the photo below.
I decided to paint the print using The Army Painter paints, starting with a coat of their brush-on primer. Then I mixed and applied some Arid Earth with a bit of Tanned Flesh, the latter adding a slight redness in the base colour. Once that dried I decided to use a little of their Soft Tone wash. Not only did that make the base colour a bit ‘dirtier’, but also it pooled around fine details, helping to highlight them. Then I diluted some Arid Earth using wash-medium, stippling it on thinly. And after a coat of Citadel Technical Stormshield the result is shown in the photo below.
So finally, in case you’d like to use the methods in this project for your own work, let’s recap on what was involved:
- The Sony 3DCreator Android app was used to create a basic 3D scan on a smartphone.
- Meshlab and Blender were used to create an initial color-by-vertex GLTF file from the scan.
- Nomad Sculpt was used on an Android tablet to remove excess digital material and repair scan defects.
- On a PC Meshmixer was used to rotate, scale and translate the model.
- The finished 3D model was then test printed in resin, and found to print to an acceptable quality.
- The resin print was then painted using The Army Painter paints.
Please note that this scan is provided without any license for commercial use. It is intended simply as a model of an ancient artefact you can have the fun of printing yourself. And of course it is intended to be a motivation for you to visit the excellent British Museum to view all their wonderful ancient displays.


