Recently I decided to buy a Revopoint Pop 3D scanner for creating models of smaller items. It’s not a cheap buy, but it did promise the ability to capture 3D scans both with a PC and turntable, and with a smartphone in the field. So obviously I wanted to test how well it captures accurate meshes, starting with how well it works with a turntable: just the mesh aspect, without colour or texture. That resulted in a trip to the local charity shop, where I bought an elephant ornament that had all the hallmarks of a good starting challenge for the Pop.
From the Revopoint website: ‘The Revopoint POP 3D scanner is a full-color scanner with unlimited scanning capabilities. The highest single-frame has an accuracy of up to 0.3mm, texture scan, 8Fps scanning speed, and can quickly generate vibrant models for 3D printing.’
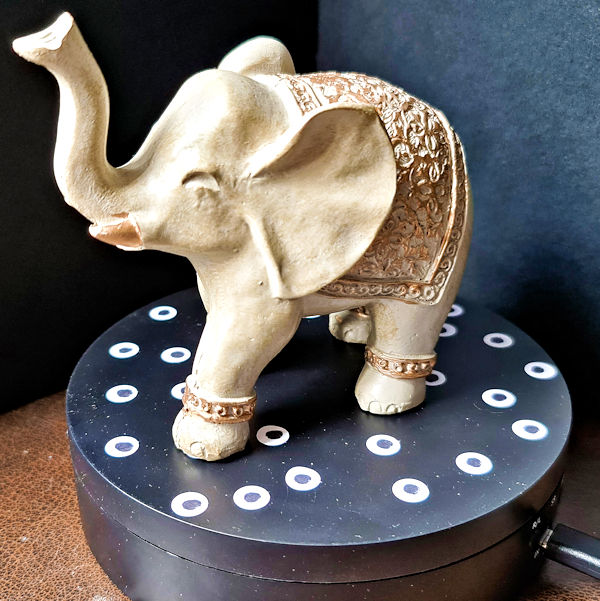
As you can see in the photo, I didn’t buy the official Revopoint turntable. Nor did I use expensive scanning markers, although Revopoint did helpfully include a few sheets of them in the box, which was a nice bonus. My turntable is simply a USB-powered one I bought on Amazon for around a quarter of the price. And for markers, which we need so the Pop can track turntable rotation, I simply used some small white self-adhesive dots from a stationary shop, with the middles coloured in using a black felt-tipped pen.
The elephant was quite big: about the same size as the turntable, which is 140mm diameter. However, it has a number of features that add challenge to this test, one being the fact that the shape prevents scanning from one position. So, the scan had to be paused a number of times, with the elephant re-placed in a number of positions, including on its side and even upside down. The software then had to work out how to adjust tracking to compensate, aligning previous data to a translated and rotated new mesh of vertices. That’s a pretty cool feature that helps make the cost worthwhile, and one which could be a deal-breaker if not implemented properly.
Also, the trunk and tusks are small and slender, which adds considerably to the difficulty. And the details in the coat over the back has shallow, but important, inset detail. So while I don’t consider this a challenge that takes the Pop to its limits, it did let me see how well it would cope with an object that is quite representative of most turntable 3D scanning I’m likely to do. And to be honest, I was quite pleased with the result, which doesn’t show any major defects due to tracking issues between the different scan positions.
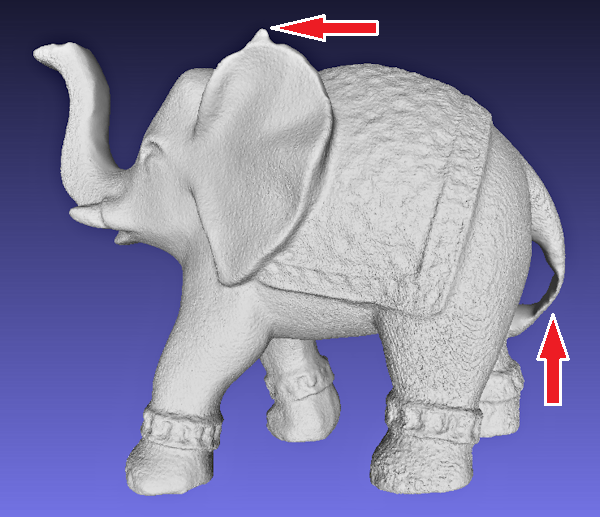
As you can see in the screenshot from Meshlab, there were only two obvious issues. The first is the rather strange lump on top of one ear. I have no idea why that appeared, although my guess is that it’s because the top of the ear is quite narrow. The other issue was that the Pop failed to properly scan the very thin part of the tail, which is perhaps unsurprising as the back of it (i.e. the badly scanned area) is mostly hidden from the Pop during scanning. Apart from that, the scan was quite sharp, although the insets in the coat were a little washed out.
The issues with the ear and tail were easily sorted out with a bit of 3D sculpting in Meshmixer. I also used Meshmixer to re-mesh the scan, using the sharp edge preserving solidify mode, to reduce the number of vertices to a more sensible size. Then I used its plane-cut tool to make sure the bottoms of the feet were level and aligned, so it wouldn’t wobble when a 3D print of it stands on a flat surface. And you can judge the quality of the finished 3D model on Sketchfab below (click the play button to load the model and view it in 3D).
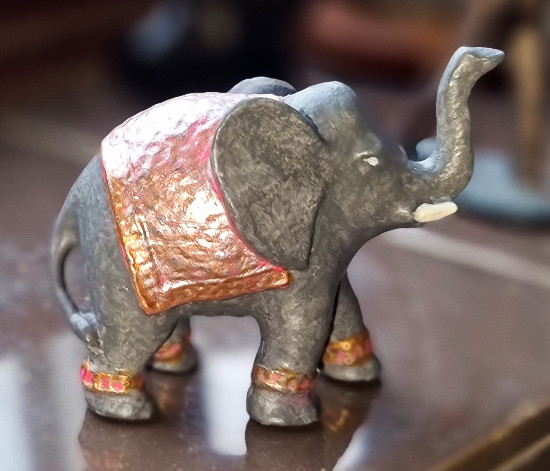
Of course, this wouldn’t be a proper test if I didn’t also make my own elephant from the scan. To start with I tried with a fused-filament printer, and some PLA filament, which worked quite well. So then I decided to make a resin version in my Anycubic Photon Mono SE SLA printer, using water-washable UV-cured resin. I then painted it with some The Army Painter paints, plus some Vallejo metal medium to spice up the coat, tusks and anklets. To finish off, I added some Citadel Technical Stormshield to provide a protective clear-coat. You can judge the result of that in the photo below.
So, finally, do I think the Revopoint Pop did a good job of the scanning? Well, it did turn out quite a nice model for fused-filament and resin 3D printing. And it coped well with the need to scan with the elephant at a number of orientations, without any major tracking issues. Plus, the outcome is a good representation of the ornament, and even small details like the eyes weren’t lost. But, I have to say that, for the price, I would have liked a better result for the fine details, especially a bit more sharpness in the coat insets. However, overall I think the outcome was quite good for a first test.


